- Soak raw rice and sago together in water for 2-3 hours.
- Rinse the soaked mixture thoroughly and drain all the water. Grind with 1/4 cup of water to a coarse texture.
- Add fresh coconut, sugar, and cardamom to the mixture. Grind again until smooth (the batter will become runny after adding sugar).
- Transfer the batter to a bowl, add a pinch of salt, and mix until it reaches dosa batter consistency.
- Heat oil in a deep kadai (wok). Using a curved ladle, pour a ladleful of batter into the hot oil.
- Allow the paniyaram to rise naturally. Gently splash hot oil over the top to cook evenly.
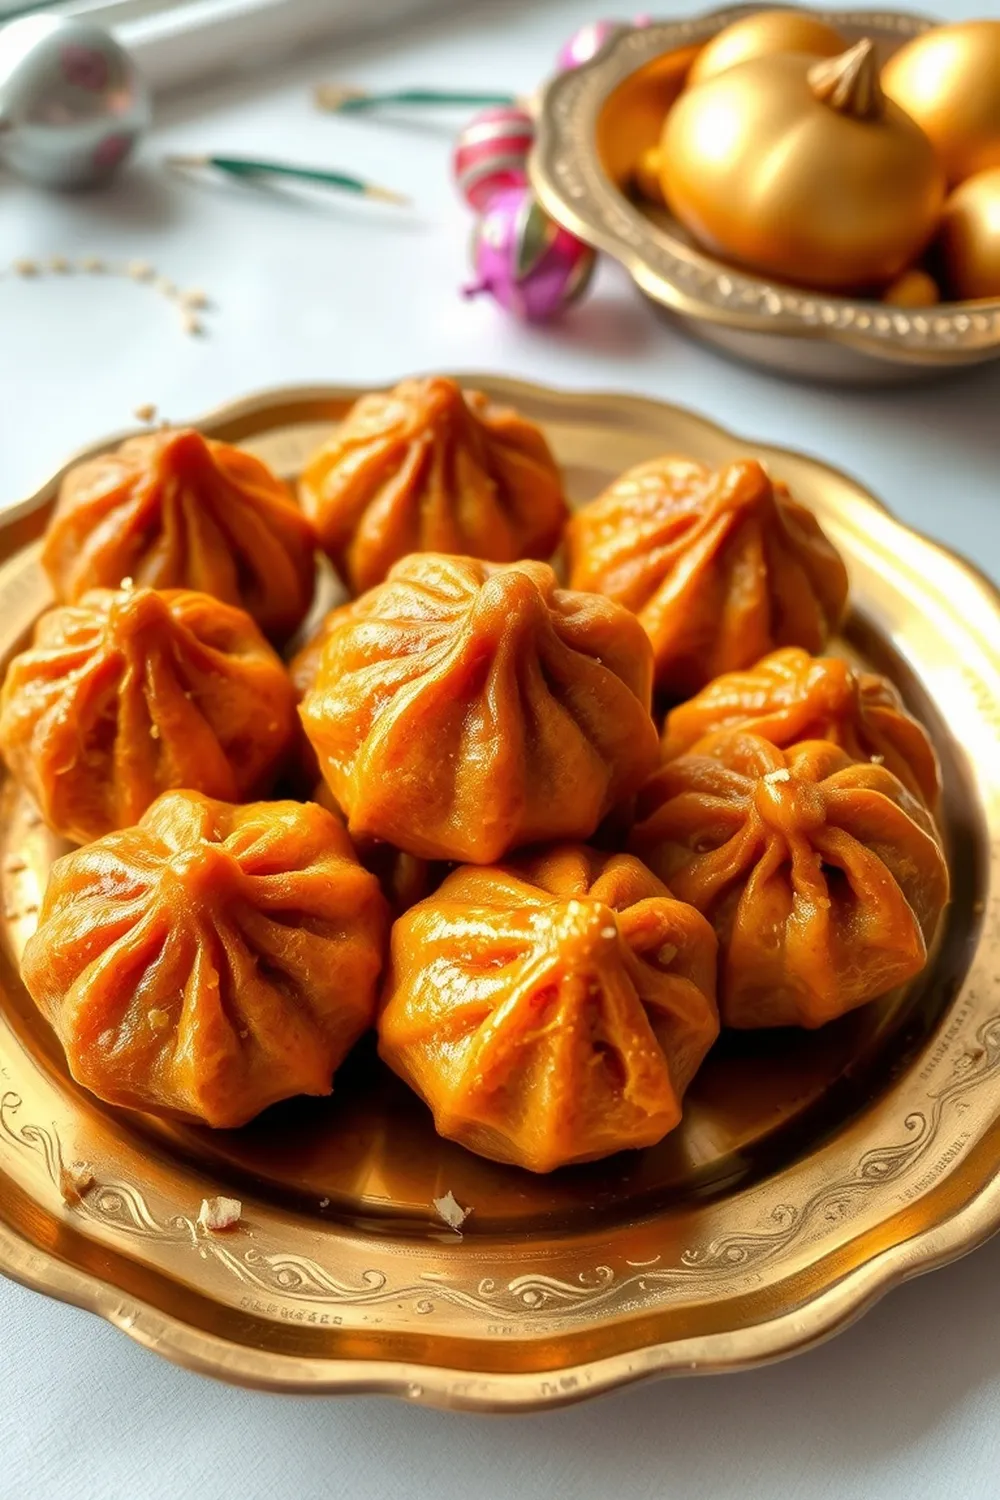
- Flip carefully and fry until golden brown on both sides. Drain on paper towels and serve warm.
- Calories:108 kcal25%
- Energy:451 kJ22%
- Protein:1 g28%
- Carbohydrates:17 mg40%
- Sugar:7 mg8%
- Salt:2 g25%
- Fat:4 g20%
Last Updated on 6 months ago by Neha Deshmukh
Authentic Paniyaram Recipe – Rice & Coconut South Indian Snack
Hey everyone! If you’ve ever wandered through the bustling streets of South India, you’ve probably been captivated by the aroma of these little fried dumplings. Paniyaram – crispy on the outside, soft on the inside, and bursting with coconutty goodness – are a beloved snack, and honestly, one of my absolute favorites. I first made these with my grandmother, and the memory still makes my kitchen feel extra special. Today, I’m sharing my family’s recipe with you, so you can experience a little bit of South Indian magic at home!
Why You’ll Love This Recipe
This Paniyaram recipe isn’t just about a delicious snack; it’s about tradition. It’s a comforting taste of home for many, and a delightful introduction to South Indian cuisine for others. It’s surprisingly easy to make, even if you’re new to Indian cooking, and the results are so worth it. Plus, who doesn’t love a little crispy, golden-brown treat? This recipe makes about 15 small paniyarams, perfect for sharing (or not!).
Prep time: 120 mins (mostly soaking!)
Cook time: 20 mins
Servings: 15 small paniyarams
Difficulty: Medium
Ingredients
Here’s what you’ll need to create these delightful bites:
- 1 cup raw rice
- 1 heaped tablespoon sago (sabudana)
- 1/4 cup coconut, grated (about 30g)
- 1/2 cup sugar (about 100g)
- 2 small cardamom pods
- A pinch of salt
- As needed water
- Oil, for frying
Ingredient Notes
Let’s talk ingredients! Getting these right will make all the difference.
Raw Rice Varieties for Paniyaram: You can use regular short-grain raw rice. Traditionally, ponni rice is preferred for its texture, but any good quality raw rice will work beautifully.
The Role of Sago (Sabudana): Sago adds a lovely slightly chewy texture to the paniyaram. Don’t skip it! It helps bind everything together.
Fresh Coconut vs. Dried Coconut: Freshly grated coconut is always best for that authentic flavor. However, if you can’t find it, unsweetened desiccated coconut will do in a pinch. Use about the same quantity.
Cardamom Quality & Flavor: Use good quality cardamom pods. They should be fragrant! Lightly crush them to release their aroma before adding them to the batter.
Oil Choice for Deep Frying – Regional Preferences: Traditionally, groundnut oil (peanut oil) is used in South India for deep frying. It has a high smoke point and imparts a lovely flavor. You can also use vegetable oil or sunflower oil if you prefer.
Step-By-Step Instructions
Alright, let’s get cooking!
- First, combine the raw rice and sago in a bowl. Add enough water to cover them completely. Let this soak for 2-3 hours – this is crucial for getting the right batter consistency.
- Once soaked, drain the rice and sago mixture really well. Then, add about 1/4 cup of water and grind it in a blender or grinder to a slightly coarse texture. Don’t over-grind; we don’t want a super smooth paste.
- Now, add the grated coconut, sugar, and crushed cardamom to the mixture. Grind again until everything is well combined and you have a smooth batter. You’ll notice it becomes quite runny as the sugar dissolves – that’s perfect!
- Pour the batter into a bowl. Add a tiny pinch of salt and mix well. The consistency should be similar to dosa batter – pourable, but not too watery.
- Heat oil in a deep kadai (wok) or frying pan over medium heat. You’ll want enough oil to allow the paniyarams to float.
- Once the oil is hot, use a curved ladle (or a regular spoon if you don’t have one) to carefully pour a ladleful of batter into the hot oil.
- Let the paniyaram cook undisturbed for a minute or two, allowing it to rise to the surface. Gently splash a little hot oil over the top to help it cook evenly.
- Carefully flip the paniyaram and fry the other side until it’s golden brown and crispy.
- Remove the paniyaram from the oil and drain on paper towels.
- Repeat with the remaining batter. Serve warm and enjoy!
Expert Tips
Want to make sure your paniyaram turn out perfectly? Here are a few tips I’ve learned over the years:
Achieving the Perfect Paniyaram Batter Consistency: The batter is key! It should be pourable but not too thin. If it’s too thick, add a little water. If it’s too thin, add a tablespoon of rice flour.
Tips for Frying Paniyaram to Golden Perfection: Don’t overcrowd the kadai. Fry in batches to maintain the oil temperature.
Preventing Paniyaram from Breaking Apart: This usually happens if the oil isn’t hot enough or if you disturb the paniyaram too much while it’s cooking.
Understanding the Oil Temperature: Test the oil by dropping a tiny drop of batter into it. If it sizzles and rises immediately, the oil is ready.
Variations
Paniyaram is a versatile snack! Here are a few ways to customize it:
Vegan Paniyaram Adaptation: Substitute the sugar with agave or maple syrup.
Gluten-Free Confirmation: This recipe is naturally gluten-free! Just double-check that your sago is certified gluten-free if you have a severe allergy.
Spice Level Adjustment – Adding Green Chilies: My friend loves a little kick! Add 1-2 finely chopped green chilies to the batter for a spicy twist.
Sweet Paniyaram – Increasing Sugar Content: If you have a serious sweet tooth (like my mom!), increase the sugar to 3/4 cup.
Festival Adaptations – Special Occasion Paniyaram: During festivals, some families add a pinch of saffron to the batter for a beautiful color and aroma.
Serving Suggestions
Paniyaram is delicious on its own, but even better with a side! Traditionally, it’s served with:
- Coconut chutney
- Sambar (lentil-based vegetable stew)
- Spicy tomato chutney
A hot cup of filter coffee is the perfect accompaniment!
Storage Instructions
Paniyaram is best enjoyed fresh, but you can store leftovers in an airtight container at room temperature for a day. They will lose some of their crispness, but still taste good. Reheat in a dry pan or oven to crisp them up.
FAQs
What type of rice is best for making Paniyaram?
Ponni rice is traditional, but any good quality short-grain raw rice will work.
Can I use store-bought coconut milk instead of fresh coconut?
You can, but the flavor won’t be quite as authentic. Use about 1/4 cup of thick coconut milk.
Can I make the batter ahead of time? If so, how should I store it?
Yes! You can make the batter a day ahead and store it in the refrigerator. It might thicken, so add a little water before frying.
My Paniyaram are breaking apart while frying. What am I doing wrong?
The oil might not be hot enough, or you might be disturbing them too much. Make sure the oil is at the right temperature and let them cook undisturbed for a minute or two before flipping.
What is the traditional accompaniment to Paniyaram?
Coconut chutney and sambar are the classic pairings!
Enjoy making these little pockets of happiness! I hope this recipe brings a little bit of South Indian sunshine into your kitchen. Let me know how they turn out in the comments below!


Neha Deshmukh
Neha holds a B.A. in History with a focus on Indian and world history, including ancient, medieval, and modern periods. At RecipesOfIndia.org — the world’s largest database of Indian recipes — she combines her love for food and history by exploring how India’s past has shaped its culinary traditions.


