- Rinse and soak urad dal and rice in water for 4-6 hours.
- Drain the water and transfer to a mixer grinder. Add curry leaves, asafoetida, green chilies, ginger, and salt.
- Blend into a thick, smooth batter. Add water sparingly to achieve the right consistency.
- Heat oil in a frying pan or wok. Wet your hands with water and flatten a small portion of batter into a disc with a hole in the center.
- Carefully slide the shaped batter into the hot oil. Fry for 2-3 minutes per side, until golden brown and crisp.
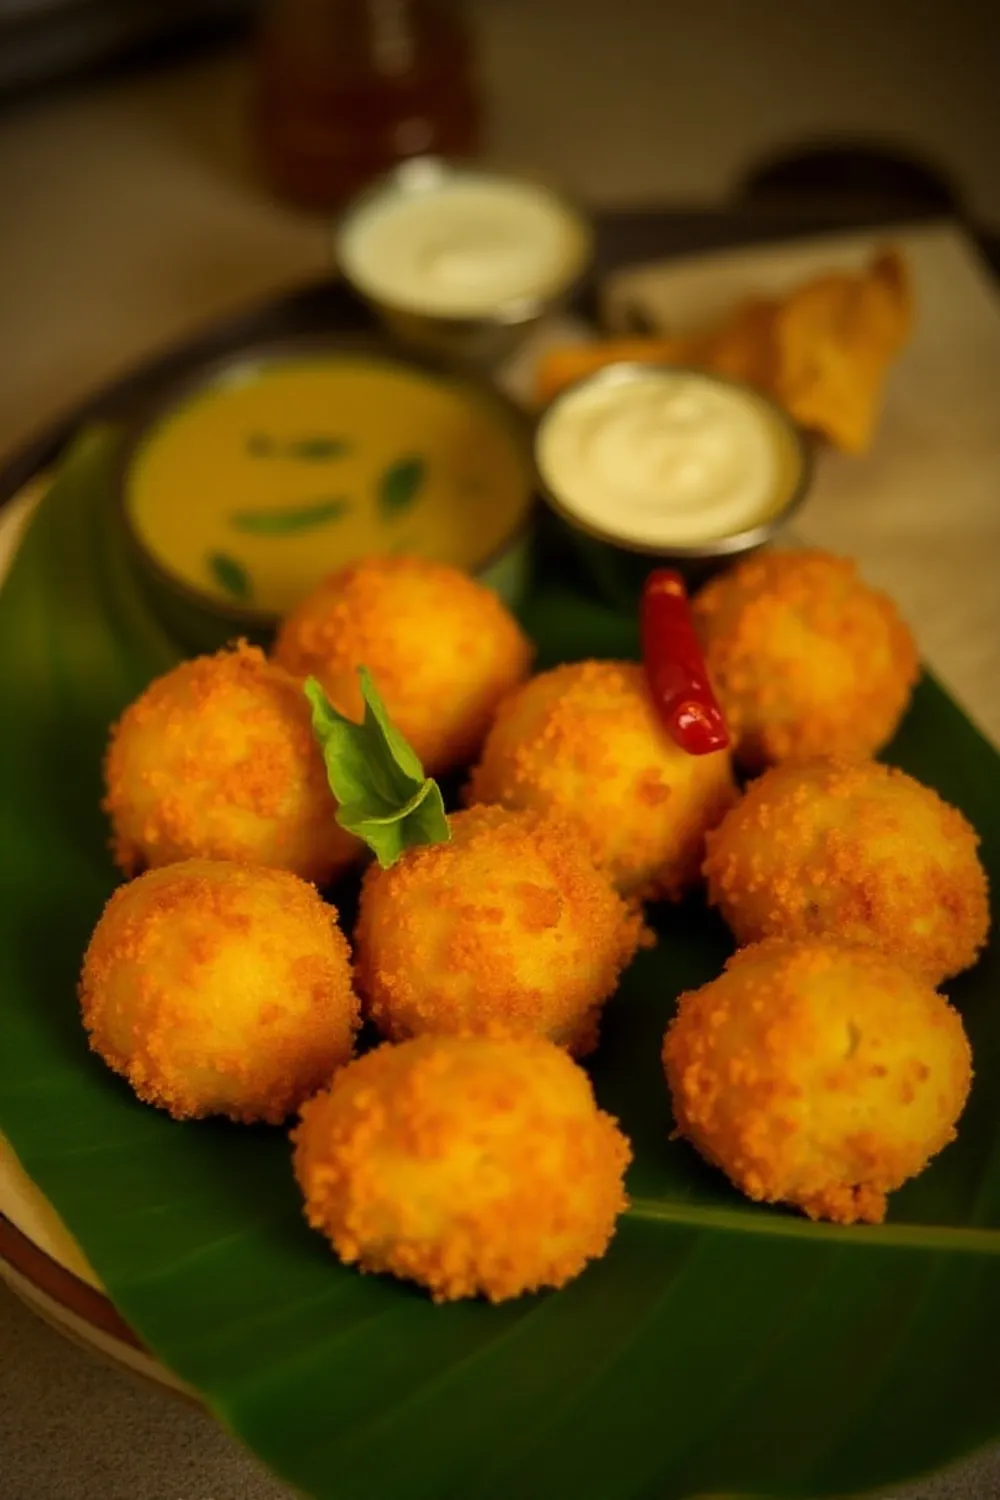
- Drain on paper towels. Serve warm with coconut chutney, sambar, or rasam.
- Calories:77.6 kcal25%
- Energy:324 kJ22%
- Protein:6.05 g28%
- Carbohydrates:12.82 mg40%
- Sugar:0.07 mg8%
- Salt:1.74 g25%
- Fat:0.24 g20%
Last Updated on 5 months ago by Neha Deshmukh
Authentic Urad Dal Dosa Recipe – Crispy South Indian Delight
Hey everyone! If you’ve ever dreamed of making those perfectly crispy, golden dosas you get at your favorite South Indian restaurant, you’re in the right place. I remember the first time I tried to make dosas – it was a bit of a disaster! But trust me, with a little patience and this recipe, you’ll be enjoying homemade dosas in no time. It’s a bit of a labor of love, but so worth it.
Why You’ll Love This Recipe
This urad dal dosa recipe isn’t just about making a delicious breakfast (or dinner, let’s be real!). It’s about connecting with a rich culinary tradition. These dosas are wonderfully crispy, flavorful, and surprisingly versatile. Plus, the aroma while they’re cooking? Heavenly! You’ll be hooked, I promise.
Ingredients
Here’s what you’ll need to create this South Indian magic:
- 2 cups urad dal (split black lentils)
- 2 tablespoons raw rice
- 7-8 curry leaves
- 5 green chillies
- 1 inch ginger
- 1 teaspoon asafoetida (hing)
- Salt to taste
- Oil for frying
Ingredient Notes
Let’s talk ingredients – getting these right makes all the difference!
Urad Dal: The Heart of the Dosa
Urad dal is the star here. Make sure you use good quality, whole urad dal for the best results. It’s what gives the dosa its lovely texture and slightly tangy flavor. (About 250g if you’re using a scale!)
Raw Rice: Choosing the Right Grain
I prefer using raw rice – it helps with the fermentation process and gives the dosa a nice crispness. You can use regular short-grain rice, but avoid parboiled rice.
Curry Leaves: Fresh vs. Dried & Regional Variations
Fresh curry leaves are always best! They add such a beautiful aroma. If you can’t find fresh, dried will do in a pinch, but use a little less as the flavor is more concentrated. Different regions in South India use varying amounts of curry leaves – feel free to adjust to your preference!
Green Chillies: Adjusting the Spice Level
I usually use 5 green chillies for a good kick, but you can adjust this based on how spicy you like things. Remove the seeds for a milder flavor.
Asafoetida (Hing): Benefits and Usage
Asafoetida might smell a little…interesting on its own, but it adds a wonderful savory depth to the dosa. It’s also known for aiding digestion! A little goes a long way.
Oil for Frying: Traditional South Indian Oils
Traditionally, groundnut oil (peanut oil) or coconut oil are used for frying dosas. They impart a lovely flavor and help achieve that perfect crispness. Vegetable oil works too, if that’s what you have on hand.
Step-By-Step Instructions
Alright, let’s get cooking!
- First, rinse the urad dal and raw rice together in a colander until the water runs clear. Then, soak them in plenty of water for at least an hour. This is crucial for a smooth batter.
- Drain the water completely. Transfer the soaked dal and rice to your mixer grinder.
- Now, add the curry leaves, green chillies, ginger, asafoetida, and salt.
- Grind everything into a thick, smooth batter. The key here is to avoid adding too much water. You want a consistency that’s like thick pancake batter. It might take a few minutes, and you might need to scrape down the sides of the grinder a few times.
- Once the batter is ready, let it ferment! This usually takes around 8-12 hours, depending on the weather. I usually leave it overnight. You’ll know it’s fermented when it’s light and fluffy and has a slightly sour smell.
- Heat a generous amount of oil in a flat frying pan or tawa over medium heat.
- Wet a ziplock bag (this is a game changer!) and flatten a small dollop of batter into a disc with a hole in the center.
- Carefully slide the shaped batter into the hot oil. Fry for 2-3 minutes per side, until golden brown and crispy.
- Drain the dosa on paper towels to remove excess oil.
- Serve immediately!
Expert Tips
Want to take your dosa game to the next level? Here are a few tips I’ve learned over the years:
Achieving the Perfect Dosa Batter Consistency
The batter should be thick enough to hold its shape but still spreadable. If it’s too thick, add a tiny bit of water. If it’s too thin, add a tablespoon of rice flour.
The Importance of Fermentation
Fermentation is key to a light and crispy dosa. The warmer the temperature, the faster it will ferment. In colder weather, you might need to leave it for longer.
Tips for Crispy Dosas
- Make sure your tawa is hot enough before you start frying.
- Use enough oil – don’t be shy!
- Spread the batter thinly.
- Don’t flip the dosa too early.
Troubleshooting Common Dosa Problems
- Dosa is sticking: Your tawa isn’t hot enough, or you haven’t used enough oil.
- Dosa is too thick: Your batter is too thick. Add a little water.
- Dosa is too soft: Your batter hasn’t fermented enough.
Variations
Dosas are so versatile! Here are a few of my favorite variations:
Vegan Dosa
This recipe is naturally vegan! Just ensure your oil is plant-based.
Gluten-Free Dosa
This recipe is also naturally gluten-free.
Spice Level Adjustments
Adjust the number of green chillies to suit your taste. You can also add a pinch of red chilli powder to the batter for extra heat.
Rava Dosa Adaptation
Add 1/2 cup of semolina (rava) to the batter for a slightly different texture.
Set Dosa Variation
For a thicker, softer dosa, don’t spread the batter as thinly.
Masala Dosa Adaptation
Fill the dosa with a spiced potato filling (masala) for a classic Masala Dosa! My grandmother’s recipe is the best – I’ll have to share that one soon.
Serving Suggestions
Dosas are best served hot and fresh! They’re delicious with:
- Coconut chutney
- Sambar
- Rasam
- A simple tomato chutney
Storage Instructions
Leftover dosa batter can be stored in the refrigerator for up to 3 days. It will continue to ferment, so it might become a little more sour. You can also freeze it for longer storage.
FAQs
Let’s answer some common questions:
What is the ideal fermentation time for dosa batter?
Generally, 8-12 hours is ideal, but it depends on the temperature. Look for a light, fluffy texture and a slightly sour smell.
Can I use a blender instead of a mixer grinder?
You can, but a mixer grinder will give you a smoother batter. If using a blender, you might need to add a little more water.
How do I prevent the dosa from sticking to the pan?
Make sure your tawa is hot enough and you’re using enough oil. A well-seasoned tawa also helps.
What is the best way to store leftover dosa batter?
Store it in an airtight container in the refrigerator for up to 3 days, or freeze it for longer storage.
Can I make dosa batter in advance and freeze it?
Yes! Freeze in portion sizes for easy use. Thaw overnight in the refrigerator before using.
Enjoy making these delicious dosas! I hope this recipe brings a little bit of South Indian sunshine into your kitchen. Let me know how they turn out in the comments below!


Neha Deshmukh
Neha holds a B.A. in History with a focus on Indian and world history, including ancient, medieval, and modern periods. At RecipesOfIndia.org — the world’s largest database of Indian recipes — she combines her love for food and history by exploring how India’s past has shaped its culinary traditions.


