- Prepare leavain by mixing starter, flour, and water. Let ferment for 5-12 hours.
- Combine dough ingredients (except butter) in a stand mixer. Knead until a shaggy dough forms.
- Gradually add butter and knead until the dough is smooth and elastic.
- Divide dough into two portions. Mix vanilla extract into one and cocoa powder into the other.
- Let dough rest for 3-4 hours with periodic stretch-and-folds (every 30-60 minutes). Refrigerate for 12-24 hours.
- Next day, bring dough to room temperature. Prepare filling by mixing coconut, milk powder, flour, and softened butter until combined.
- Roll vanilla and cocoa doughs into rectangles. Layer the cocoa dough over the vanilla dough.
- Brush with egg wash, spread filling evenly, and roll tightly into a log. Place in a greased loaf pan.
- Proof for 4-6 hours, or until the dough has risen significantly above the pan rim. Preheat oven to 375°F.
- Apply a final egg wash. Bake at 350°F for 45-55 minutes, or until the internal temperature reaches 200-205°F.
- Cool completely before slicing and serving.
- Calories:269 kcal25%
- Energy:1125 kJ22%
- Protein:10 g28%
- Carbohydrates:75 mg40%
- Sugar:20 mg8%
- Salt:300 g25%
- Fat:35 g20%
Last Updated on 2 months by Neha Deshmukh
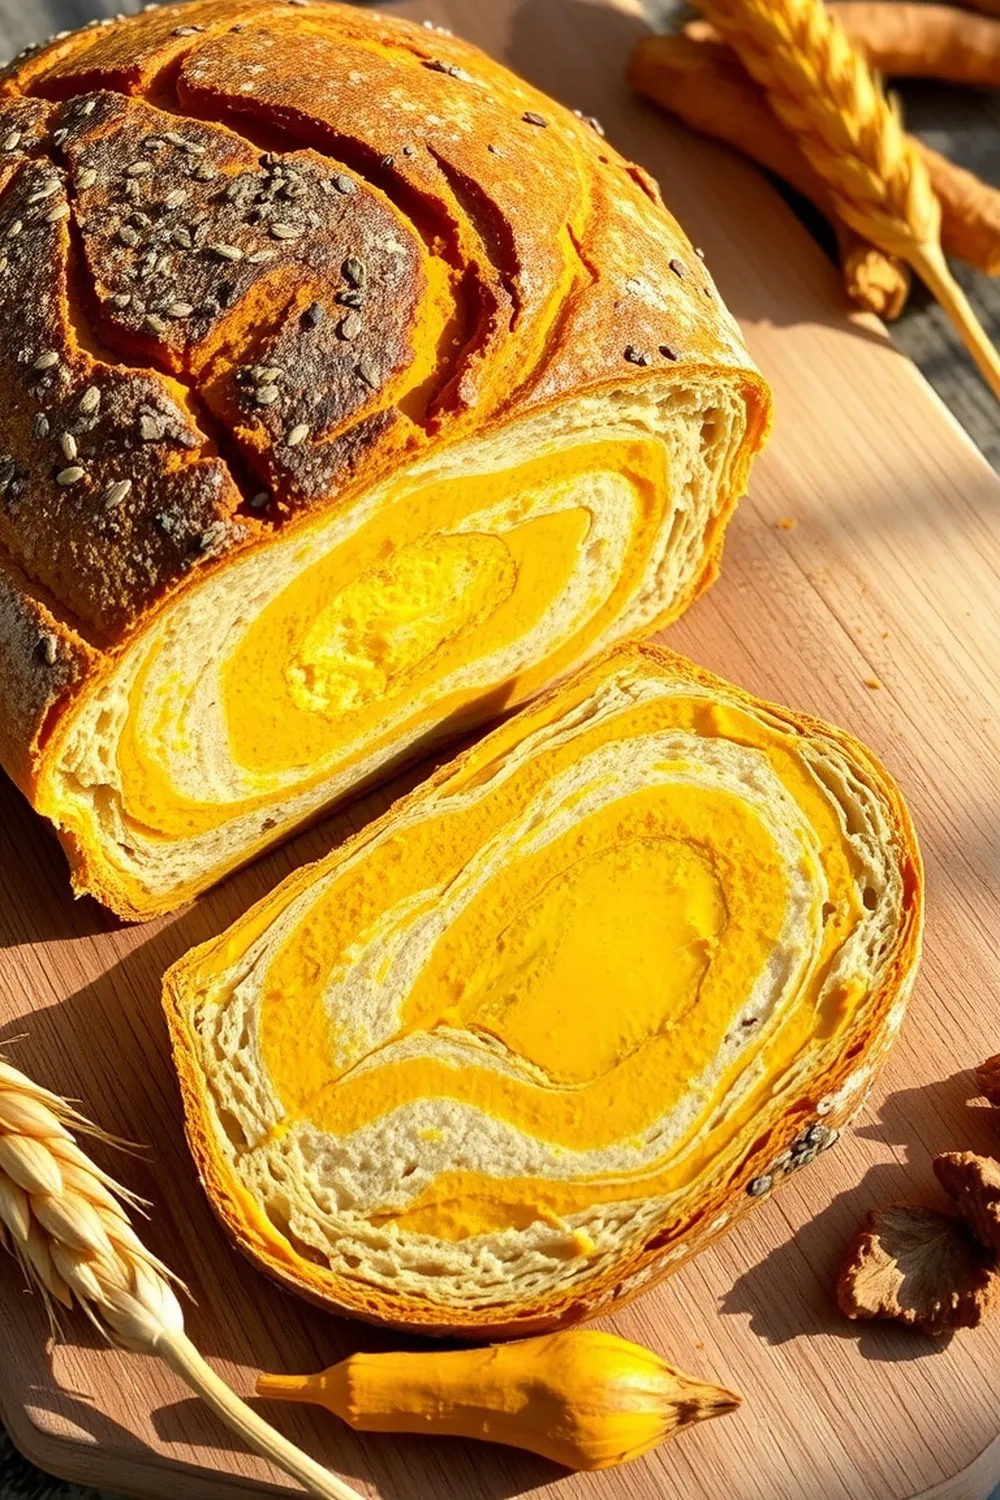
Cocoa-Vanilla Swirl Bread Recipe – Ultimate Homemade Baking Guide
Hey everyone! If you’re anything like me, the smell of freshly baked bread is pure comfort. I stumbled upon this cocoa-vanilla swirl bread a few years ago, and it’s become a total obsession. It’s a bit of a project, yes, but the reward – a beautifully swirled, soft, and flavorful loaf – is so worth it. Trust me, your kitchen will smell incredible!
Why You’ll Love This Recipe
This isn’t your average bread recipe. The combination of rich cocoa and sweet vanilla is just heavenly. Plus, the swirl is absolutely gorgeous – it’s a real showstopper! It’s perfect for a weekend baking project, a special occasion brunch, or just a cozy treat with a cup of chai. It’s a little bit special, a little bit indulgent, and a whole lot delicious.
Ingredients
Here’s what you’ll need to create this masterpiece:
- 20g starter (active and bubbly!)
- 40g all-purpose flour
- 10g whole wheat flour
- 50g water (lukewarm)
- 305g all-purpose flour
- 100g leavain (ripe)
- 35g sugar
- 4g salt
- 110g milk (full fat recommended)
- 52g butter (unsalted, softened)
- 2 large eggs
- 2 teaspoon vanilla extract
- 26g unsweetened Dutch process cocoa powder
- 56g unsalted butter (for filling)
- 15g all-purpose flour (for filling)
- 24g milk powder (important for texture!)
- 75g sweetened coconut flakes
- 1 large egg (for egg wash)
Ingredient Notes
Let’s talk ingredients for a sec, because a few things really make a difference here.
- Starter: A mature, active starter is key! It should have doubled in size and be bubbly after feeding. This is what gives the bread its lovely rise and flavor.
- Dutch-Process Cocoa: Don’t skip this! Dutch-process cocoa has a smoother, less acidic flavor than natural cocoa powder, and it gives the swirl a beautiful dark color.
- Milk Powder: This might seem odd, but trust me on this one. Milk powder in the filling adds a wonderful richness and helps create a stable, non-liquidy filling that won’t bleed into the vanilla dough. It’s a game changer!
- Butter: Using good quality, unsalted butter really elevates the flavor.
Step-By-Step Instructions
Alright, let’s get baking!
- Make the Leavain: In a small bowl, combine the starter, 40g all-purpose flour, 10g whole wheat flour, and 50g water. Mix well, cover, and let it ferment at room temperature for about 5 hours, or until doubled and bubbly.
- Combine Dough Ingredients: In the bowl of a stand mixer fitted with a dough hook, combine the 305g all-purpose flour, 100g leavain, 35g sugar, 4g salt, 110g milk, and 2 large eggs. Knead on low speed until a sticky mass forms.
- Add Butter: Gradually add the 52g softened butter, a little at a time, allowing each addition to fully incorporate before adding more. Continue kneading until the dough is smooth and elastic. This will take some time – be patient!
- Divide and Flavor: Divide the dough into two equal portions. To one portion, add the 2 teaspoon vanilla extract and knead to combine. To the other portion, add the 26g cocoa powder and knead until evenly distributed.
- Bulk Fermentation & Stretch and Folds: Place both doughs in lightly oiled bowls, cover, and let them rest for 3 hours. During this time, perform stretch and folds every 30-60 minutes. This develops strength in the dough. After the 3 hours, refrigerate both doughs overnight.
- Prepare the Filling: While the dough chills, make the filling. In a bowl, combine the 56g softened butter, 15g all-purpose flour, 24g milk powder, and 75g sweetened coconut flakes. Mix well until it forms a smooth paste.
- Roll and Assemble: The next day, bring the doughs to room temperature. Roll each dough into a rectangle about 12×8 inches. Layer the cocoa dough over the vanilla dough.
- Fill and Roll: Brush the cocoa dough with a beaten egg (egg wash). Spread the coconut filling evenly over the cocoa dough. Starting from one long end, roll the dough tightly into a log. Place the log seam-side down in a greased loaf pan.
- Proof: Cover the loaf pan and let the dough proof for at least 4 hours, or until it rises above the rim of the pan. This is a long proof, so be patient!
- Bake: Preheat your oven to 425°F (218°C). Brush the top of the loaf with another egg wash. Bake at 375°F (190°C) for 33 minutes, or until the internal temperature reaches 195°F (90°C).
- Cool: Let the bread cool completely in the pan before slicing and enjoying.
Expert Tips
- Dough Consistency: The dough will be sticky, that’s normal! Resist the urge to add too much flour. A slightly sticky dough results in a softer bread.
- Temperature Control: Proofing time will vary depending on your room temperature. Warmer temperatures mean faster proofing.
- Checking for Doneness: Use an instant-read thermometer to ensure the internal temperature reaches 195°F (90°C). This guarantees a fully baked loaf.
Variations
- Vegan Adaptation: Substitute the milk with plant-based milk (like almond or soy), and use a vegan butter substitute. You’ll also need to find a vegan egg wash alternative (aquafaba works well!).
- Gluten-Free Adaptation: Use a high-quality gluten-free flour blend designed for bread making. You may need to adjust the liquid slightly.
- Spice Level: Add a teaspoon of cardamom or cinnamon to the filling for a warm, fragrant twist. My grandmother always added a pinch of nutmeg!
- Festival Adaptations: This bread makes a beautiful gift during Diwali or Christmas. Wrap it in festive paper and ribbon for a thoughtful present.
Serving Suggestions
This bread is amazing on its own, but it’s even better with a smear of butter or a dollop of cream cheese. It pairs perfectly with a cup of masala chai or a glass of cold milk.
Storage Instructions
Store the bread in an airtight container at room temperature for up to 3 days. You can also freeze it for longer storage.
FAQs
What is a leavain and how does it differ from commercial yeast?
A leavain is a naturally fermented mixture of flour and water that contains wild yeasts and bacteria. It’s a slower, more flavorful alternative to commercial yeast.
Can I use instant yeast instead of a starter? If so, what adjustments should I make?
Yes, you can! Use about 7g of instant yeast. You can skip the leavain step and add the yeast directly to the dough ingredients. Reduce the water slightly, as instant yeast doesn’t absorb as much liquid.
What does Dutch-process cocoa powder do differently than natural cocoa powder?
Dutch-process cocoa is treated to neutralize its acidity, resulting in a smoother, milder flavor and a darker color.
How can I tell if my dough has proofed enough?
The dough should have doubled in size and feel light and airy. Gently poke it with your finger – if the indentation slowly springs back, it’s ready to bake.
Can this bread be frozen after baking?
Yes! Let the bread cool completely, then wrap it tightly in plastic wrap and foil. It will keep in the freezer for up to 2 months.
How can I prevent the swirl from disappearing during baking?
Rolling the dough tightly and chilling it before baking helps preserve the swirl. Also, avoid over-proofing, as this can cause the layers to blend together.
Enjoy baking, and let me know how it turns out! I love hearing from you all.


Neha Deshmukh
Neha holds a B.A. in History with a focus on Indian and world history, including ancient, medieval, and modern periods. At RecipesOfIndia.org — the world’s largest database of Indian recipes — she combines her love for food and history by exploring how India’s past has shaped its culinary traditions.