
- Cream together softened butter and granulated sugar in a bowl until light and fluffy. Beat in egg yolk and vanilla extract until well combined.
- Gradually incorporate flour (and optional cornstarch) to form a soft dough. Wrap in plastic wrap and refrigerate for 30 minutes.
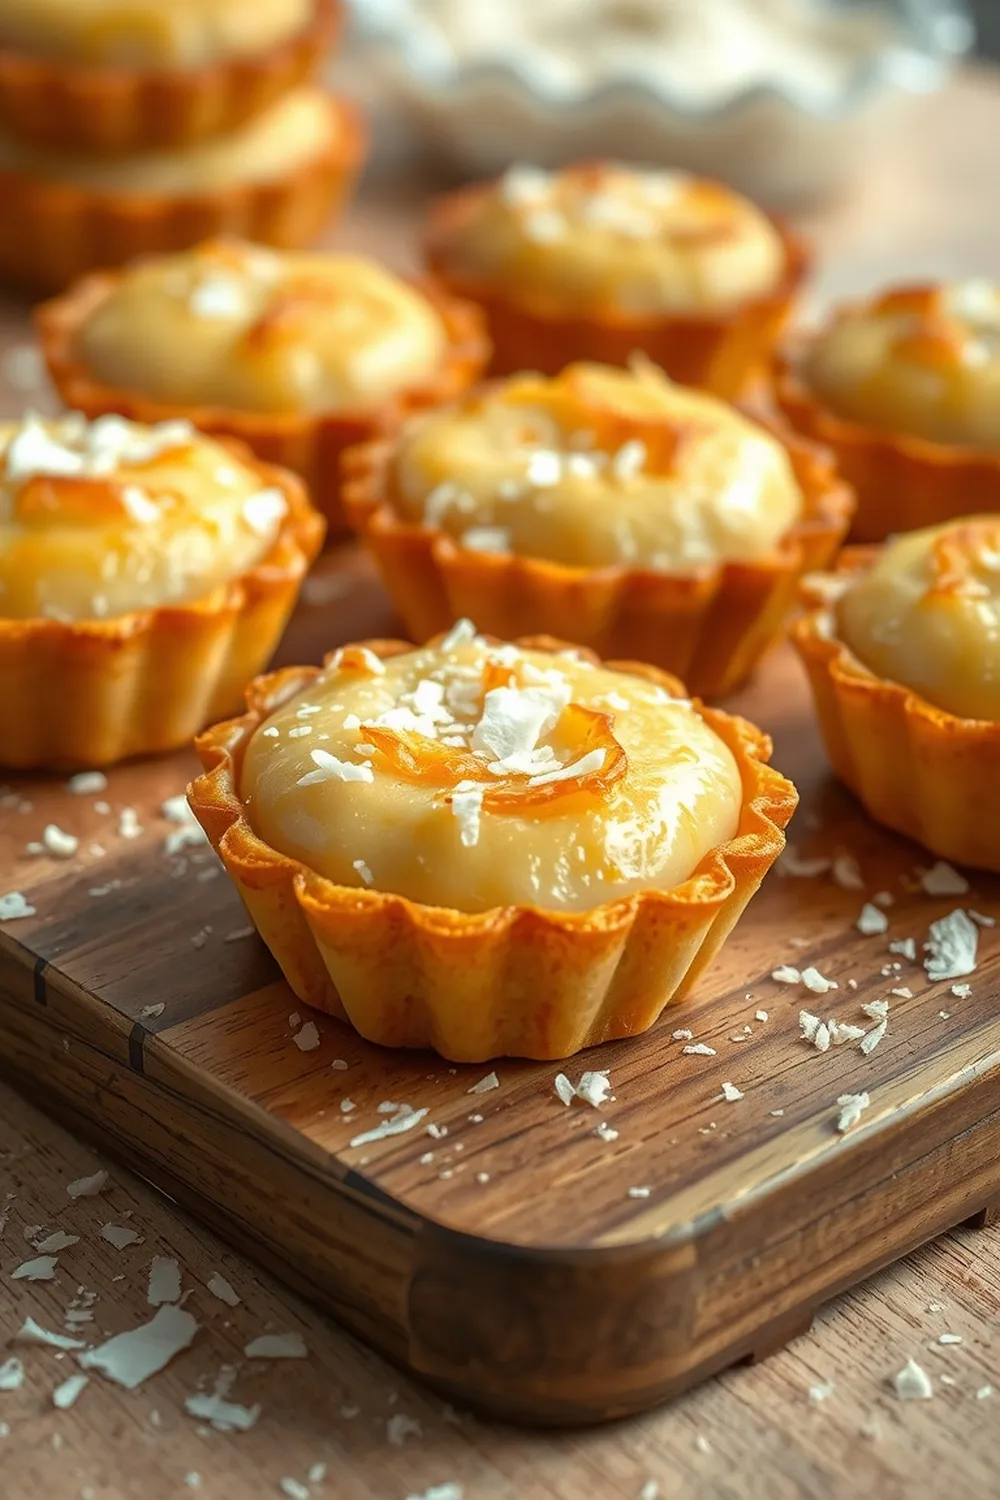
- Roll chilled dough into 6 rounds and gently press into 11cm tart tins. Chill again while preparing the filling.
- In a bowl, whisk together desiccated coconut, flour, and baking powder. In a separate bowl, whisk sugar, milk/cream, vanilla extract, melted butter, egg, and salt.
- Combine wet and dry ingredients, mixing until smooth. Divide filling evenly among the tart shells.
- Bake at 160°C (320°F) for 20-25 minutes, or until golden brown. Cool in the tins for 10 minutes before carefully removing.
- Calories:280 kcal25%
- Energy:1171 kJ22%
- Protein:3 g28%
- Carbohydrates:28 mg40%
- Sugar:15 mg8%
- Salt:120 g25%
- Fat:18 g20%
Last Updated on 6 months ago by Neha Deshmukh
Coconut Tart Recipe – Easy Indian-Inspired Baking Guide
Hey everyone! If you’re anything like me, you’re always on the lookout for a little something sweet that feels special but isn’t too complicated to make. These Coconut Tarts are exactly that! They’re wonderfully fragrant, have a lovely delicate texture, and honestly, they just feel a bit fancy – perfect for a weekend treat or a small celebration. I first made these when my niece came to visit, and they were a huge hit! Let’s get baking.
Why You’ll Love This Recipe
These aren’t your average tarts. The combination of the buttery, crumbly crust and the creamy, coconut-rich filling is just divine. Plus, they’re surprisingly easy to put together, even if you’re not a seasoned baker. They’re a little slice of sunshine, and honestly, who doesn’t need a bit of that? They’re also a great way to introduce a touch of Indian-inspired flavour to your baking – the coconut really shines through!
Ingredients
Here’s what you’ll need to create these delightful Coconut Tarts:
- 100 gram butter, softened
- 2.5 tbsp granulated sugar
- 1 egg yolk
- 1 tsp vanilla extract
- 200 ml cake wheat flour or all-purpose flour (plus extra for dusting)
- 1.25 cup/100g desiccated coconut
- 1 tbsp all-purpose flour
- 0.5 tsp baking powder
- 0.33 cup/65g granulated sugar
- 0.25 cup/60ml milk or fresh cream
- 1 tsp vanilla extract
- 2 tbsp/30g butter, melted
- 1 egg
- Pinch of salt
Ingredient Notes
Let’s talk ingredients for a sec! A few little things can make all the difference.
- Desiccated Coconut: This is the star of the show! Make sure it’s good quality – it really impacts the flavour. I prefer the finely shredded kind for a smoother filling.
- Milk or Cream: You can use either! Milk will give you a slightly lighter tart, while cream will make it extra rich and decadent. I often use cream when I’m feeling indulgent.
- Flour Power: I love using cake wheat flour for a super tender crust, but all-purpose flour works perfectly well too. If you’re using all-purpose, just be careful not to overwork the dough.
Step-By-Step Instructions
Alright, let’s get down to business!
- First, in a bowl, cream together the 100g softened butter and 2.5 tbsp granulated sugar until it’s light and fluffy. Then, beat in the egg yolk and 1 tsp vanilla extract until everything is nicely combined.
- Now, gently mix in the 200ml flour (and optionally, a little cornflour for extra tenderness!). Mix until a soft dough forms. Don’t overmix! Wrap the dough in cling film and pop it in the fridge for at least 30 minutes to chill.
- While the dough is chilling, let’s make the filling. In a bowl, combine the 1.25 cup desiccated coconut, 1 tbsp flour, and 0.5 tsp baking powder.
- In a separate bowl, whisk together the 0.33 cup sugar, 0.25 cup milk/cream, 1 tsp vanilla extract, 2 tbsp melted butter, 1 egg, and a pinch of salt.
- Pour the wet ingredients into the dry ingredients and mix until everything is smooth and well combined.
- Take the chilled dough out of the fridge. Roll it out and press it into 6 individual 11cm tart tins. Prick the base with a fork to prevent bubbling. Chill the tart shells again while you prepare for baking.
- Divide the coconut filling evenly among the tart shells.
- Bake in a preheated oven at 160°C (320°F) for 20-30 minutes, or until the tarts are golden brown and the filling is set.
- Let them cool in the tins for about 10 minutes before carefully removing them.
Expert Tips
- Chilled Dough is Key: Seriously, don’t skip the chilling steps! It makes the dough so much easier to work with and helps prevent shrinking during baking.
- Don’t Overbake: Keep a close eye on them towards the end of the baking time. You want them golden, but not burnt!
- Gentle Handling: Be gentle with the dough – overworking it will result in a tough crust.
Variations
Want to switch things up? Here are a few ideas:
- Vegan Adaptation: Swap the butter for a good quality plant-based butter and the milk/cream for your favourite plant-based alternative. Easy peasy!
- Gluten-Free Adaptation: Use a gluten-free flour blend instead of wheat flour.
- Spice Level: My friend Priya adds a pinch of cardamom to the filling for a lovely warm flavour. It’s delicious!
- Festival Adaptation: These are perfect for Diwali or any other celebration. They look so pretty arranged on a platter. My family loves them during festive season.
Serving Suggestions
These Coconut Tarts are lovely on their own with a cup of chai. You could also serve them with a dollop of whipped cream or a scoop of vanilla ice cream for an extra special treat.
Storage Instructions
Store leftover tarts in an airtight container at room temperature for up to 3 days, or in the fridge for up to 5 days.
FAQs
1. Can I use fresh coconut instead of desiccated coconut?
You can, but it’s a bit more work! You’ll need to grate the fresh coconut and then squeeze out any excess moisture. Desiccated coconut is much more convenient and gives a consistent texture.
2. What is the best way to prevent the tart crust from shrinking?
Chilling the dough thoroughly is the biggest help. Also, pricking the base of the tart shell with a fork before baking prevents it from puffing up and shrinking.
3. Can these tarts be made ahead of time?
Yes! You can make the dough and filling a day ahead and store them separately in the fridge. Assemble and bake the tarts when you’re ready to serve.
4. What’s the difference between cake wheat flour and all-purpose flour in this recipe?
Cake wheat flour has a lower protein content, which results in a more tender and delicate crust. All-purpose flour works fine, but the crust might be slightly more robust.
5. Can I freeze these coconut tarts?
Yes, you can! Let them cool completely, then wrap them individually in plastic wrap and place them in a freezer-safe container. They’ll keep for up to 2 months. Thaw them at room temperature before serving.
Enjoy baking (and eating!) these little beauties. Let me know how they turn out for you!

Neha Deshmukh
Neha holds a B.A. in History with a focus on Indian and world history, including ancient, medieval, and modern periods. At RecipesOfIndia.org — the world’s largest database of Indian recipes — she combines her love for food and history by exploring how India’s past has shaped its culinary traditions.


