- In a large mixing bowl, combine whole wheat flour, leftover dal, salt, red chili powder, chopped green chilies, cilantro, and methi leaves. Mix well to form a dough, adding water as needed. Alternatively, use a food processor to knead the dough.
- Cover the dough and let it rest for 20-30 minutes.
- Divide the dough into 6-8 equal portions. Roll each portion into a ball and flatten into a circle using a rolling pin, dusting with dry flour as needed.
- Heat a griddle or tava over medium heat. Place the rolled paratha on the hot griddle and cook until bubbles form on the surface.
- Flip the paratha, apply ghee or oil, and cook until golden brown spots appear on both sides.
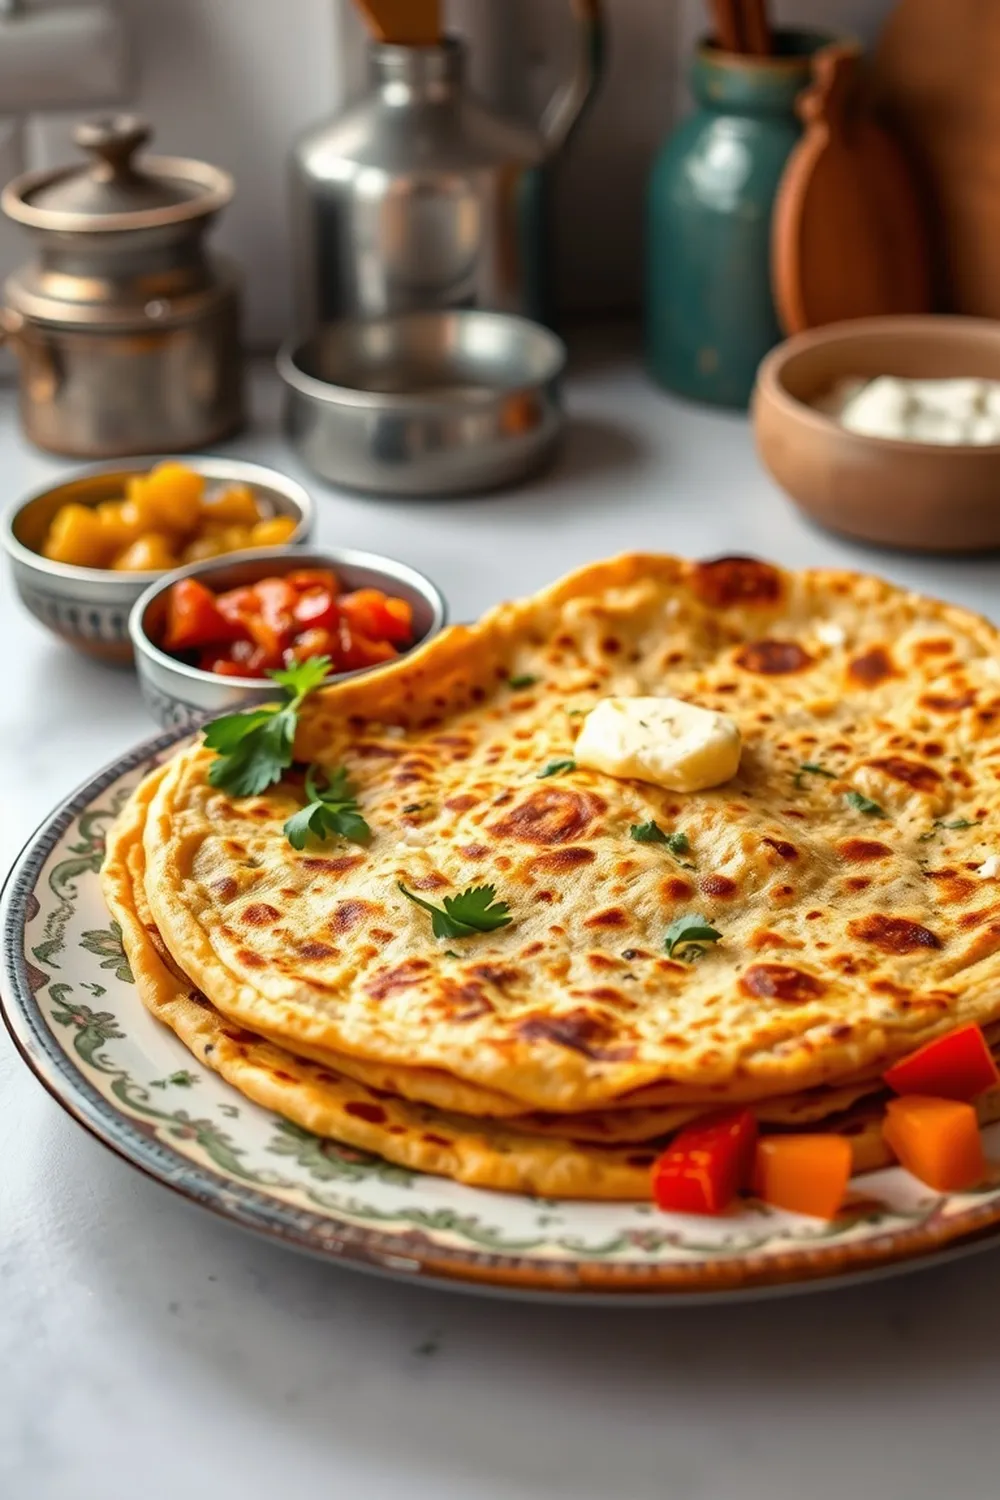
- Serve hot with butter, yogurt, or your favorite pickle.
- Calories:256 kcal25%
- Energy:1071 kJ22%
- Protein:11 g28%
- Carbohydrates:40 mg40%
- Sugar:1 mg8%
- Salt:81 g25%
- Fat:7 g20%
Last Updated on 2 months by Neha Deshmukh
Dal Paratha Recipe – Methi & Whole Wheat Flatbread
Hey everyone! If you’re anything like me, you love a good paratha. There’s just something so comforting about a warm, flaky flatbread, especially when it’s packed with flavour. Today, I’m sharing my go-to recipe for Dal Paratha – a delicious and clever way to use up leftover dal! I first made this when I was trying to reduce food waste, and honestly, it’s become a family favourite. It’s a little bit rustic, a whole lot tasty, and surprisingly easy to make.
Why You’ll Love This Recipe
This Dal Paratha isn’t just about using up leftovers (though that’s a huge bonus!). It’s about creating something truly special with simple ingredients. The dal adds a lovely protein boost and a unique flavour that you won’t find in regular parathas. Plus, the addition of fresh methi (fenugreek) leaves takes it to another level. Trust me, you’ll be making this again and again!
Ingredients
Here’s what you’ll need to whip up these flavourful parathas:
- 2 cup whole wheat flour (atta)
- 1 cup leftover dal (cooked) – any dal works!
- 2 cup fresh methi leaves (fenugreek leaves), chopped
- 1 tablespoon cilantro (coriander leaves), chopped
- 3 chopped green chilies (optional)
- ½ teaspoon red chili powder (adjust to your spice preference)
- to taste salt
- 2 tablespoon ghee or oil (for cooking)
Ingredient Notes
Let’s talk ingredients for a sec, because a few little tweaks can make all the difference!
Leftover Dal – Utilizing Cooked Dal for Flavor & Texture
Any cooked dal will work beautifully here – masoor, toor, moong, chana… you name it! I usually use whatever I have on hand. Just make sure it’s not overly watery. If it is, drain some of the liquid before adding it to the dough. About 200-250g of cooked dal is perfect.
Methi Leaves (Fenugreek) – Regional Variations & Health Benefits
Methi leaves have a slightly bitter, earthy flavour that complements the dal perfectly. They’re also incredibly good for you! In some regions of India, especially Punjab, methi parathas are a winter staple. If you can’t find fresh methi, you can use about 2-3 tablespoons of dried methi leaves, but rehydrate them in warm water for 10 minutes first.
Whole Wheat Flour – Exploring Different Flour Options
I prefer using whole wheat flour (atta) for that authentic paratha texture. You can experiment with different types of atta, like multigrain or even a mix of wheat and millet flour for added nutrition. Around 250g of atta is what you’re looking for.
Ghee vs. Oil – Understanding the Flavor Differences
Traditionally, parathas are cooked with ghee (clarified butter) for a rich, nutty flavour. But oil works just fine too, especially if you’re looking for a lighter option. I sometimes use a mix of both! About 30ml of ghee or oil is ideal.
Step-By-Step Instructions
Alright, let’s get cooking!
- In a large mixing bowl, combine the whole wheat flour, leftover dal, salt, red chili powder, chopped green chilies (if using), cilantro, and methi leaves.
- Mix everything well with your hands. Start adding water gradually, a tablespoon at a time, and knead to form a soft, pliable dough. You can also use a food processor for this – just pulse until the dough comes together.
- Cover the dough with a damp cloth and let it rest for 20-30 minutes. This allows the gluten to relax, making the parathas softer.
- Divide the dough into 6-8 equal portions. Roll each portion into a ball and then flatten it slightly with your hands.
- Dust your rolling surface with a little dry flour. Roll out each ball into a circle, about 6-8 inches in diameter. Don’t worry if it’s not perfect!
- Heat a griddle (tawa) over medium heat. Place the rolled paratha on the hot griddle and cook for about 30-60 seconds, until small bubbles start to appear on the surface.
- Flip the paratha and apply a teaspoon of ghee or oil. Cook until golden brown spots appear. Repeat on the other side.
- Serve hot!
Expert Tips
- Don’t over-knead the dough: Over-kneading can make the parathas tough.
- Use warm water: Warm water helps the dough come together more easily.
- Roll evenly: Try to roll the parathas to an even thickness for consistent cooking.
- Cook on medium heat: Cooking on high heat can burn the parathas before they’re cooked through.
Variations
Want to switch things up? Here are a few ideas:
- Vegan Dal Paratha: Simply substitute the ghee with any plant-based oil. My friend, Priya, swears by using coconut oil for a subtle sweetness.
- Gluten-Free Dal Paratha: Use a gluten-free flour blend instead of whole wheat flour. It might require a little more liquid to get the right consistency.
- Spice Level Adjustment: If you like things extra spicy, add a pinch of cayenne pepper or a finely chopped serrano chili.
- Festival Adaptations (e.g., Holi, Lohri): During festivals, my family loves adding a little bit of grated paneer (Indian cheese) to the dough for extra richness.
Serving Suggestions
Dal Paratha is incredibly versatile! It’s delicious on its own, but even better with:
- A dollop of butter or yogurt
- Your favourite pickle (mango pickle is a classic!)
- A side of raita (yogurt dip)
- A simple vegetable curry
Storage Instructions
Leftover Dal Paratha can be stored in an airtight container in the refrigerator for up to 2 days. Reheat on a griddle or in a skillet until warmed through. You can also freeze them! Wrap each paratha individually in plastic wrap and then place them in a freezer-safe bag. They’ll keep for up to a month.
FAQs
Let’s answer some common questions:
What type of dal works best for Dal Paratha?
Honestly, any dal works! Masoor, toor, moong, chana – use whatever you have leftover.
Can I make the dough ahead of time?
Yes, absolutely! You can make the dough a day in advance and store it in the refrigerator. Just bring it to room temperature before rolling.
How do I prevent the parathas from becoming too hard?
Don’t over-knead the dough, and don’t cook them on high heat. Adding a little bit of yogurt to the dough can also help keep them soft.
What is the best way to incorporate the methi leaves?
Chop the methi leaves finely and mix them well into the dough. This ensures they’re evenly distributed.
Can I freeze leftover Dal Paratha?
Yes! Wrap them individually and freeze for up to a month.
Enjoy making these delicious Dal Parathas! I hope they become a favourite in your home too. Let me know how they turn out in the comments below!


Neha Deshmukh
Neha holds a B.A. in History with a focus on Indian and world history, including ancient, medieval, and modern periods. At RecipesOfIndia.org — the world’s largest database of Indian recipes — she combines her love for food and history by exploring how India’s past has shaped its culinary traditions.


