- In a small bowl, lightly beat half an egg and set aside.
- In a mixing bowl, combine rice flour, salt, baking powder, sugar, black sesame seeds, the beaten egg, coconut milk, and water. Mix until smooth (the consistency should resemble pancake or dosa batter).
- Heat oil in a deep pan and heat the achappam/rosette mold in the oil.
- Once the oil is hot, remove the mold, dip it into the batter (ensuring it is drained of excess batter), and immediately return it to the hot oil.
- Fry until the achappam detaches from the mold (about 1 minute). Use a skewer to gently loosen if needed. Cook until golden and crisp.
- Drain the achappam on paper towels. Cool completely before storing in an airtight container.
- Calories:50 kcal25%
- Energy:209 kJ22%
- Protein:1 g28%
- Carbohydrates:8 mg40%
- Sugar:2 mg8%
- Salt:20 g25%
- Fat:2 g20%
Last Updated on 3 months by Neha Deshmukh
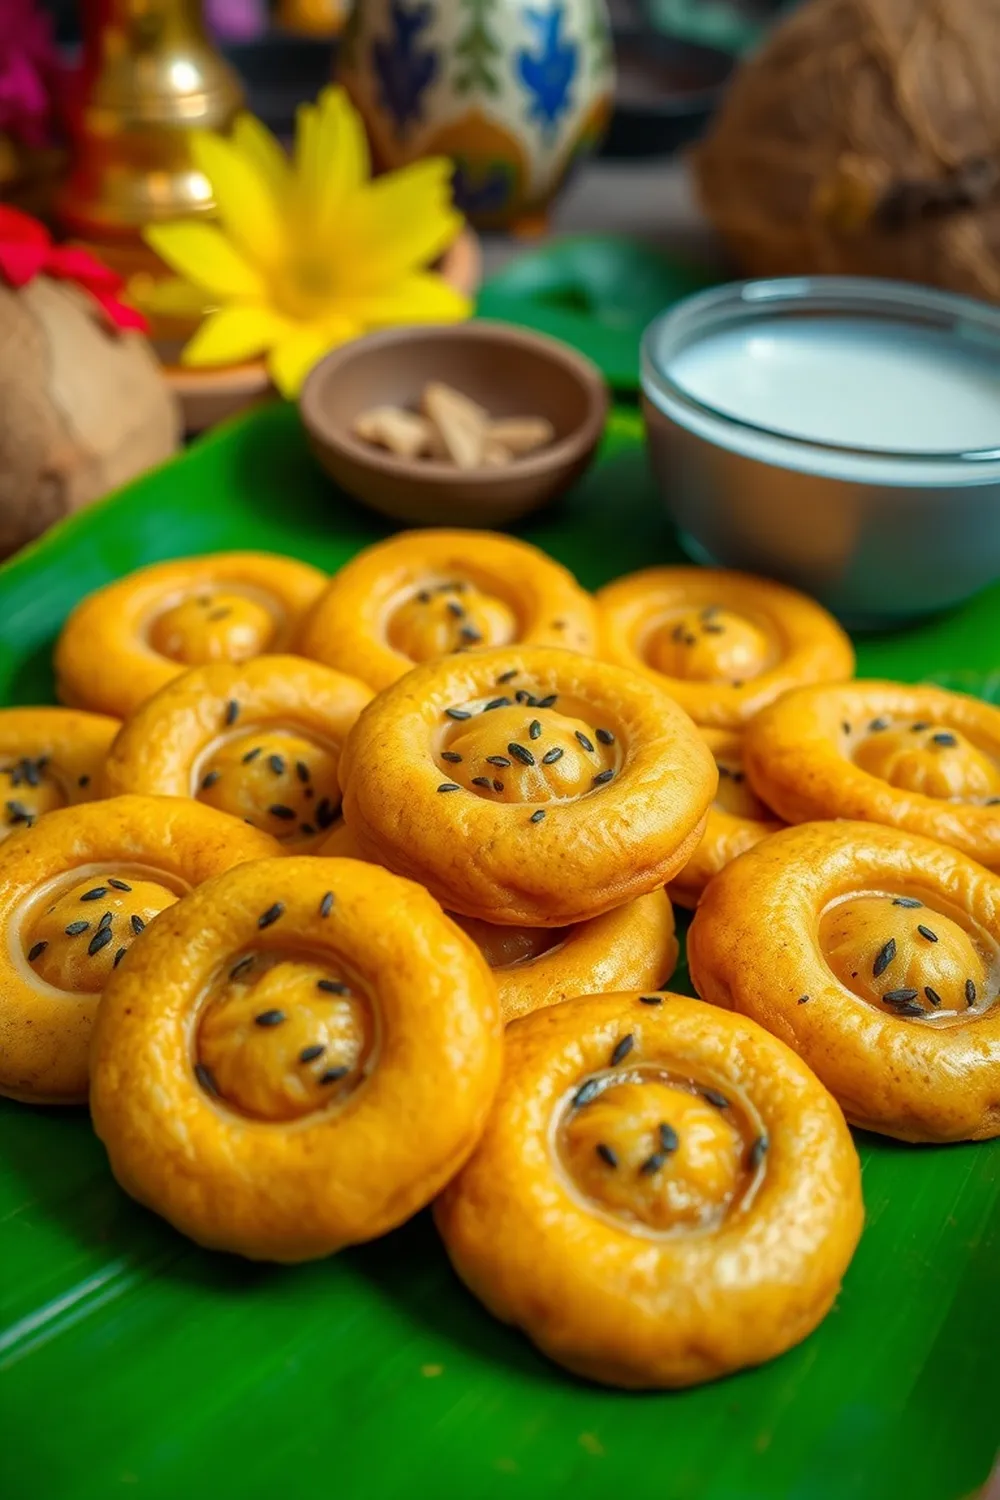
Easy Achappam Recipe – Kerala Rice Flour & Coconut Milk Cookies
Hey everyone! If you’ve ever been to Kerala, especially during festivals like Onam or Vishu, you’ve probably been offered these delicate, rosette-shaped cookies called Achappam. They’re a little bit fiddly to make, but so worth the effort. I remember the first time I tried making these – it took a few attempts to get the hang of it, but the sweet, crispy results were absolutely divine! Today, I’m sharing my tried-and-true recipe with you, so you can enjoy a little piece of Kerala in your own kitchen.
Why You’ll Love This Recipe
Achappam isn’t just a cookie; it’s a tradition. These crispy, slightly sweet treats are a staple in Kerala homes, especially during celebrations. They’re wonderfully light and airy, with a subtle coconut flavor and a delightful crunch. Plus, the beautiful rosette shape makes them perfect for gifting or simply enjoying with a cup of chai. Trust me, once you make these, you’ll be hooked!
Ingredients
Here’s what you’ll need to create these Kerala beauties:
- 1 cup rice flour (approximately 170g)
- 1 tablespoon all-purpose flour (approximately 8g)
- 1 cup coconut milk (approximately 240ml)
- ½ cup water (approximately 120ml) – adjust as needed
- 1 teaspoon salt (approximately 6g)
- 1 egg
- 1 teaspoon baking powder (approximately 4g)
- ¼ cup sugar (approximately 50g)
- 1 tablespoon black sesame seeds (approximately 7g)
- Oil, for frying
Ingredient Notes
Let’s talk ingredients! Getting these right will make all the difference.
- Rice Flour: This is the star of the show! Make sure you’re using good quality rice flour for the best texture. You can find it at most Indian grocery stores.
- Coconut Milk: Freshly squeezed coconut milk is amazing if you can get it, but canned coconut milk works perfectly well too. I usually go for the full-fat version for a richer flavor.
- Black Sesame Seeds: These add a lovely nutty flavor and visual appeal. Don’t skip them! They’re readily available in Indian stores, and even some larger supermarkets now stock them.
- Achappam Mold: This is essential! It’s a specially designed mold that creates the rosette shape. You can find these online (Amazon is a good place to start) or at Indian grocery stores. They’re usually made of metal and come in various designs. If you’re struggling to find one, search for “Indian cookie mold” or “rosette cookie mold.”
Step-By-Step Instructions
Alright, let’s get cooking!
- In a small bowl, lightly beat the egg and set it aside.
- In a mixing bowl, combine the rice flour, all-purpose flour, salt, baking powder, and sugar. Give it a good mix.
- Now, add the beaten egg, coconut milk, and water to the dry ingredients.
- Mix everything together until you have a smooth batter. The consistency should be similar to pancake or dosa batter – not too thick, not too runny. Add a little more water if needed to achieve the right consistency.
- Heat oil in a deep pan over medium heat. Make sure there’s enough oil for the achappam to float.
- Submerge the achappam mold in the hot oil for a few seconds. This prevents the batter from sticking.
- Remove the mold from the oil (carefully!), and immediately dip it into the batter, ensuring it’s well coated. Drain off any excess oil.
- Gently lower the batter-coated mold back into the hot oil.
- Fry for about 1 minute, or until the batter detaches from the mold and turns golden brown and crispy. If it’s sticking, use a skewer to gently loosen it.
- Carefully remove the achappam from the oil and drain on paper towels.
- Let them cool completely before storing.
Expert Tips
A few little things that will help you nail this recipe:
- Oil Temperature: Maintaining the right oil temperature is key. If it’s too cold, the achappam will absorb too much oil. If it’s too hot, they’ll burn quickly.
- Mold Prep: Always heat the mold in the oil before dipping it in the batter. This is crucial for preventing sticking.
- Batter Consistency: Don’t be afraid to adjust the water to get the perfect batter consistency. It should flow easily but still hold its shape.
- Don’t overcrowd the pan: Fry a few achappam at a time to maintain the oil temperature.
Variations
Want to put your own spin on things? Here are a few ideas:
- Vegan Adaptation: Replace the egg with a flax egg (1 tablespoon flaxseed meal mixed with 3 tablespoons water, let sit for 5 minutes) and use plant-based milk instead of coconut milk.
- Gluten-Free Adaptation: Ensure your rice flour is certified gluten-free, as some brands may process it in facilities that also handle wheat.
- Spice Level: Add a pinch of cardamom powder or grated ginger to the batter for a warm, aromatic flavor. My grandmother always added a tiny bit of ginger!
- Festival Adaptations: During Onam and Vishu, some families add a touch of saffron to the batter for a beautiful golden hue.
Serving Suggestions
Achappam is best enjoyed fresh, with a hot cup of chai or filter coffee. They also make a lovely snack on their own! They’re perfect for serving to guests or packing in lunchboxes.
Storage Instructions
Store cooled achappam in an airtight container at room temperature for up to 3-4 days. They tend to lose their crispness over time, but they’ll still taste delicious!
FAQs
Let’s answer some common questions:
- What is an Achappam mold and where can I find one? An Achappam mold is a metal mold used to shape the cookies. You can find them online at Amazon or in Indian grocery stores.
- Can I make the batter ahead of time? Yes, you can! The batter can be made a few hours in advance and stored in the refrigerator. You might need to add a little water to thin it out before frying.
- How do I get the Achappam to release from the mold easily? Make sure the mold is properly heated in the oil before dipping it in the batter. Also, don’t overcrowd the pan, and use a skewer to gently loosen the achappam if needed.
- What is the best type of oil to use for frying Achappam? Vegetable oil, sunflower oil, or coconut oil are all good choices.
- Can I use a different type of flour besides rice flour? While rice flour is traditional, you could experiment with other gluten-free flours, but the texture will be different. I wouldn’t recommend substituting wheat flour, as it won’t give you the same light and crispy result.
Enjoy making these delightful Kerala cookies! I hope this recipe brings a little bit of sunshine and sweetness into your kitchen. Happy cooking!


Neha Deshmukh
Neha holds a B.A. in History with a focus on Indian and world history, including ancient, medieval, and modern periods. At RecipesOfIndia.org — the world’s largest database of Indian recipes — she combines her love for food and history by exploring how India’s past has shaped its culinary traditions.


