- Combine flour (maida), sugar, baking soda, and salt in a large bowl. Mix well.
- Gradually add milk to form a soft, sticky dough. Knead for 8-10 minutes until smooth and elastic.
- Add 2 tbsp oil and knead again for 2-3 minutes. Let the dough rest in a greased bowl for at least 2 hours, or preferably overnight.
- Divide the dough into small balls and rest them in oil for 30-45 minutes.
- Flatten each ball slightly with your hands, then roll out into a thin, oval or circular sheet using a rolling pin.
- Fold the sheet in half, then in half again to form a rectangle. Roll tightly into a spiral, tucking one end underneath to seal.
- Gently flatten the spiral slightly and cook on a hot, lightly oiled pan or griddle until golden brown on both sides, pressing gently with a spatula.
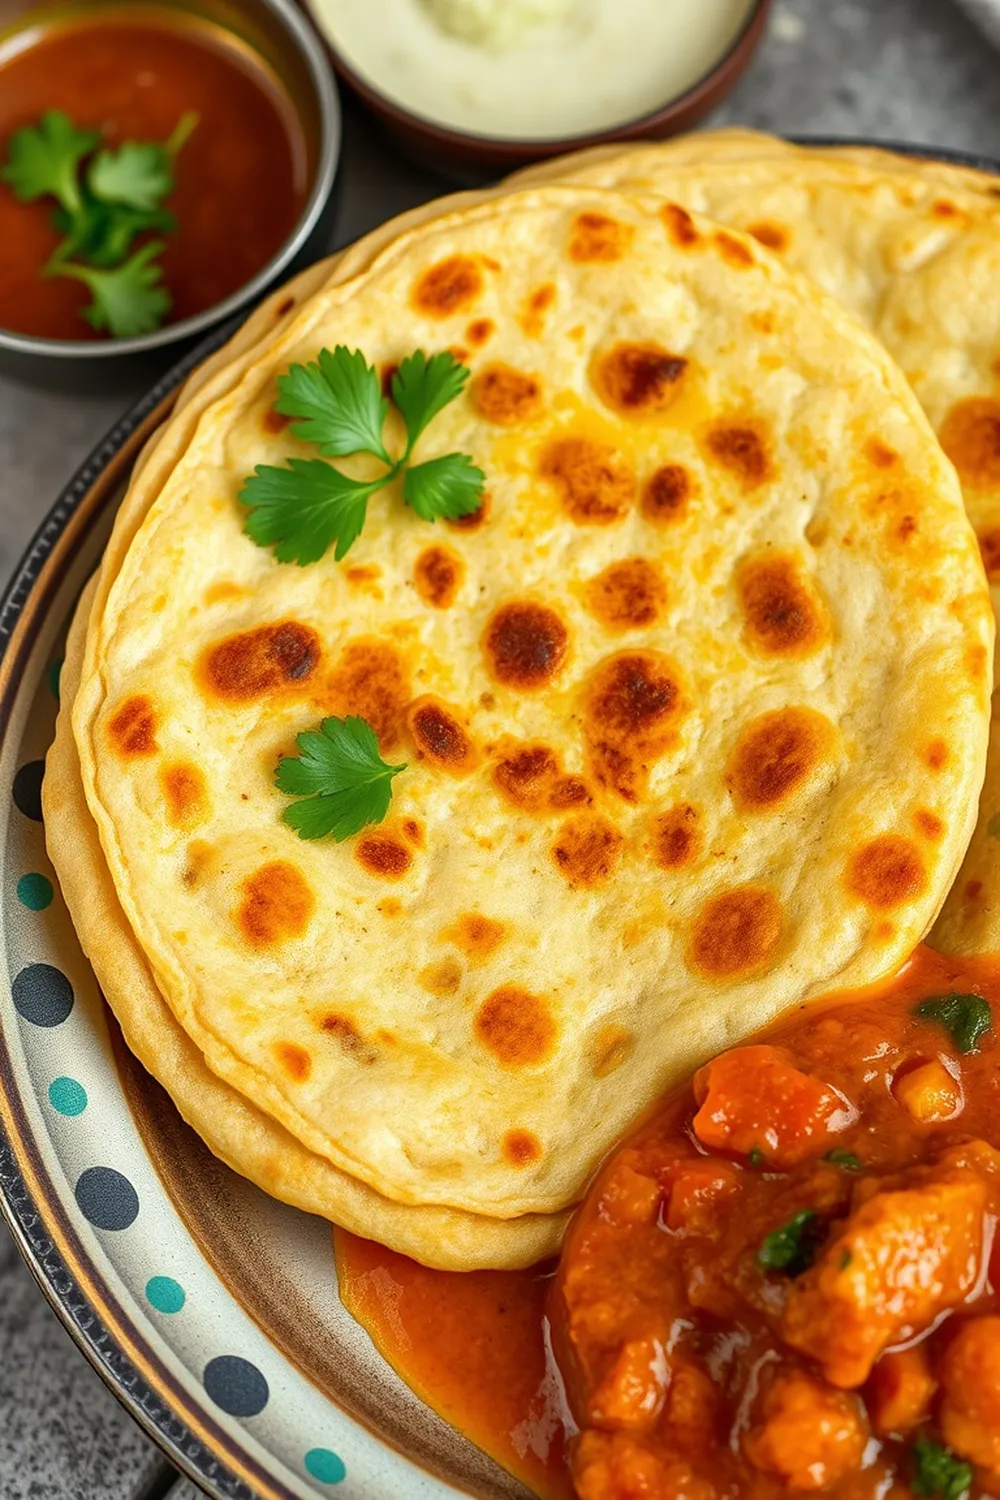
- Crush gently to separate the layers before serving immediately with your favorite curry.
- Calories:238 kcal25%
- Energy:995 kJ22%
- Protein:5 g28%
- Carbohydrates:37 mg40%
- Sugar:2 mg8%
- Salt:180 g25%
- Fat:7 g20%
Last Updated on 6 months ago by Neha Deshmukh
Flaky Laccha Paratha Recipe – Easy Indian Flatbread
Hey everyone! If you’ve ever been to a good Indian restaurant, you’ve probably been served those incredibly flaky, layered flatbreads that just melt in your mouth. Those are Laccha Parathas! I remember the first time I tried making these at home – it felt a little daunting, but trust me, with a little patience, you can absolutely nail it. They’re so worth the effort, especially when served with your favorite curry. Let’s get started!
Why You’ll Love This Recipe
Laccha Parathas are a staple in many Indian homes, and for good reason. They’re incredibly versatile – perfect for breakfast, lunch, or dinner. The beautiful layers create a wonderfully soft and flaky texture that’s just irresistible. Plus, the subtle flavor makes them a perfect accompaniment to almost any Indian dish. You’ll love how impressive they look, even though they’re surprisingly achievable at home!
Ingredients
Here’s what you’ll need to make these amazing parathas:
- 3 cup maida (all-purpose flour) – about 360g
- 1 tbsp sugar – about 12g
- 0.25 tsp baking soda – about 1.25g
- 0.5 tsp salt – about 2.5g
- 1 cup milk – about 240ml
- 0.25 cup oil – about 60ml
Ingredient Notes
Let’s talk ingredients for a sec, because getting these right makes all the difference!
Maida (All-Purpose Flour) – Types and Substitutions
Maida is the traditional flour used for laccha paratha because of its gluten content, which gives the parathas their elasticity and layers. However, if you’re gluten-free, you can experiment with a gluten-free all-purpose blend, but the texture will be different. You might need to adjust the milk quantity.
Oil – Choosing the Right Oil for Flavor and Flakiness
I prefer using a neutral-flavored oil like sunflower or vegetable oil for the dough. But for cooking, a little ghee (clarified butter) adds a fantastic aroma and flavor! You can also use mustard oil if you enjoy its pungent taste – it’s a regional favorite in some parts of India.
Baking Soda – The Role in Texture
Don’t skip the baking soda! It helps create a slightly tender texture and contributes to the flakiness. A little goes a long way, so measure carefully.
Milk – Temperature and Alternatives
I usually use room temperature milk. It helps activate the gluten in the maida. You can also use warm milk, but don’t make it hot. For a vegan version, feel free to substitute with plant-based milk like almond or soy milk.
Sugar – Purpose in the Dough
The sugar isn’t there to make the parathas sweet! It helps with browning and adds a subtle tenderness to the dough.
Step-By-Step Instructions
Alright, let’s get cooking!
- First, in a large bowl, combine the maida, sugar, baking soda, and salt. Give it a good mix to make sure everything is evenly distributed.
- Now, gradually add the milk, mixing as you go. You’ll start to form a sticky dough. Don’t worry if it feels a bit messy at first!
- Time to knead! Knead the dough for about 15-20 minutes until it becomes smooth and elastic. This is a workout, but it’s important for developing the gluten.
- Add 2 tablespoons of oil to the dough and knead again for another couple of minutes. This will make the dough even softer.
- Grease a box or bowl with a little oil. Place the dough inside, cover it, and let it rest for at least 2 hours. This resting period is crucial – it allows the gluten to relax, making the parathas easier to roll.
- After resting, divide the dough into small, equal-sized balls. I usually make about 8-10 parathas from this recipe.
- Place the dough balls in a plate and coat them with oil. Let them rest in the oil for another 30 minutes. This helps them stay soft and prevents them from sticking together.
- Now for the fun part! Flatten each ball slightly with your hands. Then, using a rolling pin, roll it out into a thin sheet – about 6-8 inches in diameter.
- Here comes the “laccha” magic! Fold the edges of the sheet towards the center, creating a rectangle. Then, roll the rectangle tightly into a coil. Tuck one end of the coil into the center to form a circular shape.
- Gently flatten the coil slightly with your hands.
- Heat a flat pan (tawa) over medium heat. Add a little oil. Place the flattened paratha on the hot pan and cook for about 1-2 minutes on each side, until golden brown and slightly puffed up.
- Gently crush the paratha with a clean cloth or spatula to separate the layers. Serve immediately with your favorite curry!
Expert Tips
Here are a few things I’ve learned over the years to make perfect laccha parathas:
Kneading the Dough – Achieving the Right Consistency
The dough should be soft and pliable, but not sticky. If it’s too sticky, add a little more maida, one tablespoon at a time.
Resting the Dough – Importance of Gluten Development
Seriously, don’t skip the resting time! It makes a huge difference in the texture of the parathas.
Rolling Technique – Creating Thin, Even Layers
Try to roll the parathas as evenly as possible. This ensures they cook evenly and have consistent layers.
Folding and Rolling – Mastering the Laccha Effect
The tighter you roll the coil, the more layers you’ll get!
Cooking the Paratha – Achieving Golden Brown Perfection
Keep the heat at medium. If it’s too high, the parathas will burn before they cook through.
Variations
Want to switch things up? Here are a few ideas:
Vegan Laccha Paratha
Simply substitute the milk with plant-based milk and use oil instead of ghee for cooking.
Whole Wheat Laccha Paratha
Replace half of the maida with whole wheat flour (atta) for a healthier version. You might need to add a little more milk to adjust the consistency.
Spice Level Adjustments (Green Chilies, Red Chili Powder)
Add finely chopped green chilies or a pinch of red chili powder to the dough for a spicy kick. My friend loves adding a little kasuri methi (dried fenugreek leaves) too!
Festival Adaptations (Holi, Diwali)
During festivals, I sometimes add a little saffron to the dough for a beautiful color and aroma.
Serving Suggestions
Laccha Parathas are amazing with so many dishes! Here are a few of my favorites:
- Chole (chickpea curry)
- Dal Makhani (black lentil curry)
- Paneer Butter Masala (cottage cheese curry)
- Aloo Sabzi (potato curry)
- Yogurt (raita)
Storage Instructions
Laccha Parathas are best enjoyed fresh. However, you can store leftover parathas in an airtight container in the refrigerator for up to 2 days. Reheat them on a tawa or in a microwave.
FAQs
What is the best way to prevent the parathas from becoming hard?
The key is to keep them covered while resting and to cook them on medium heat. Also, crushing them gently after cooking helps keep them soft.
Can I make the dough ahead of time?
Yes, you can! You can make the dough a day in advance and store it in the refrigerator. Just bring it to room temperature before rolling.
What type of oil gives the best flavor for laccha paratha?
Ghee (clarified butter) adds the best flavor, but a neutral oil like sunflower or vegetable oil works well too.
Is it possible to freeze laccha paratha?
Yes, you can freeze uncooked parathas. Place them between sheets of parchment paper to prevent them from sticking together.
How do I achieve more layers in my laccha paratha?
Roll the dough as thinly as possible and roll the coil tightly. Also, gently crush the paratha after cooking to separate the layers.
Enjoy making these flaky, delicious Laccha Parathas! I hope this recipe brings a little bit of Indian culinary magic to your kitchen. Let me know how they turn out in the comments below!


Neha Deshmukh
Neha holds a B.A. in History with a focus on Indian and world history, including ancient, medieval, and modern periods. At RecipesOfIndia.org — the world’s largest database of Indian recipes — she combines her love for food and history by exploring how India’s past has shaped its culinary traditions.


