- Proof yeast: Combine sugar, yeast, and warm water. Let sit for 5-10 minutes until foamy.
- Prepare dough: Combine flours, salt, oil, and proofed yeast mixture. Knead into a smooth dough.
- First rise: Place dough in a lightly oiled bowl, turning to coat. Cover and let rise in a warm place for 1-1.5 hours, or until doubled in size.
- Make garlic butter: Combine butter, garlic, oregano, carom seeds (optional), nutritional yeast (optional), salt, and pepper.
- Divide dough in half. Roll each half into a 12-inch thick rectangle. Spread evenly with garlic butter.
- Roll dough tightly into logs. Slice each log into 4 equal pieces.
- Arrange rolls cut-side up in a greased baking pan. Brush with remaining garlic butter. Let rise for 20-30 minutes.
- Preheat oven to 190°C (375°F). Bake for 20-25 minutes, or until golden brown and hollow when tapped.
- Calories:280 kcal25%
- Energy:1171 kJ22%
- Protein:6 g28%
- Carbohydrates:40 mg40%
- Sugar:4 mg8%
- Salt:350 g25%
- Fat:12 g20%
Last Updated on 6 months ago by Neha Deshmukh
Garlic Herb Rolls Recipe – Whole Wheat & Vegan Option
Hey everyone! If you’re anything like me, the smell of freshly baked bread is pure comfort. And these Garlic Herb Rolls? They take that comfort to a whole new level. I first made these during the festive season, and they were gone in minutes! They’re soft, fluffy, bursting with flavour, and surprisingly easy to make. Plus, I’ve included options to make them vegan and even gluten-free, so everyone can enjoy!
Why You’ll Love This Recipe
These aren’t your average rolls. We’re talking a delightful blend of whole wheat goodness, a generous slathering of garlicky, herby butter, and a little touch of Indian spice. They’re perfect for a weekend brunch, a side with your favourite curry, or just a cozy night in. Honestly, you’ll find a reason to bake these again and again.
Ingredients
Here’s what you’ll need to whip up a batch of these beauties:
- 0.5 tablespoon sugar
- 1 teaspoon dry active yeast
- 1.5 cups whole wheat flour (about 190g)
- 2 tablespoons all-purpose flour (about 16g)
- 0.5 teaspoon salt
- 1 tablespoon oil
- 2 tablespoons softened butter (vegan or dairy)
- 0.5 tablespoon sunflower oil
- 0.5-0.67 tablespoon minced garlic (about 8-10g)
- 1 teaspoon chopped celery
- 0.25 teaspoon dried oregano
- 1-2 teaspoons nutritional yeast (optional)
- Salt and pepper to taste
Ingredient Notes
Let’s talk ingredients – a few little tips from my kitchen to yours!
Whole Wheat Flour & All-Purpose Flour Blend: I love using a mix of whole wheat and all-purpose flour. It gives the rolls a lovely texture and a slightly nutty flavour. You can adjust the ratio to your liking, but I find this blend works perfectly.
Sunflower Oil – A Healthy Choice: I prefer sunflower oil for its neutral flavour and health benefits. You can substitute with olive oil if you prefer, but it will impart a slightly different taste.
The Aroma of Garlic & Celery: Don’t skimp on the garlic! Freshly minced garlic is best, but you can use garlic paste in a pinch. The celery adds a subtle freshness that complements the garlic beautifully.
Carom Seeds (Ajwain) – A Unique Indian Touch (Optional): This is where things get interesting! Carom seeds, or ajwain, add a lovely digestive quality and a unique flavour that’s common in Indian breads. If you’re feeling adventurous, definitely give it a try – 1-2 teaspoons in the garlic butter is perfect.
Nutritional Yeast – For a Cheesy Flavor (Optional): If you’re vegan or just love a cheesy flavour, nutritional yeast is your friend! It adds a savoury depth that’s surprisingly satisfying.
Step-By-Step Instructions
Alright, let’s get baking!
- Proof yeast: In a small bowl, mix the sugar, yeast, and about 1/2 cup (120ml) of warm water. Give it a gentle stir and let it sit for 10-12 minutes, until it gets nice and frothy. This means your yeast is alive and kicking!
- Prepare dough: In a large bowl, combine the whole wheat flour, all-purpose flour, and salt. Add the oil and the yeast mixture. Knead everything together until you have a smooth, elastic dough. It should take about 5-7 minutes.
- First rise: Lightly coat a clean bowl with oil. Place the dough in the bowl, turning to coat it with oil. Cover the bowl with plastic wrap or a clean kitchen towel and let it rise in a warm place for 1.5-2 hours, or until it has doubled in size. Patience is key here!
- Make garlic butter: While the dough is rising, let’s make that amazing garlic butter. In a bowl, beat together the softened butter, sunflower oil, minced garlic, chopped celery, oregano, carom seeds (if using), nutritional yeast (if using), salt, and pepper.
- Shape the rolls: Once the dough has doubled, gently punch it down to release the air. Divide the dough into two equal parts. Roll each part into a roughly 10-12 inch (25-30cm) thick rectangle. Spread the garlic butter evenly over the dough.
- Roll & Slice: Roll each rectangle up tightly into a log. Using a sharp knife, slice each log into 4 equal pieces.
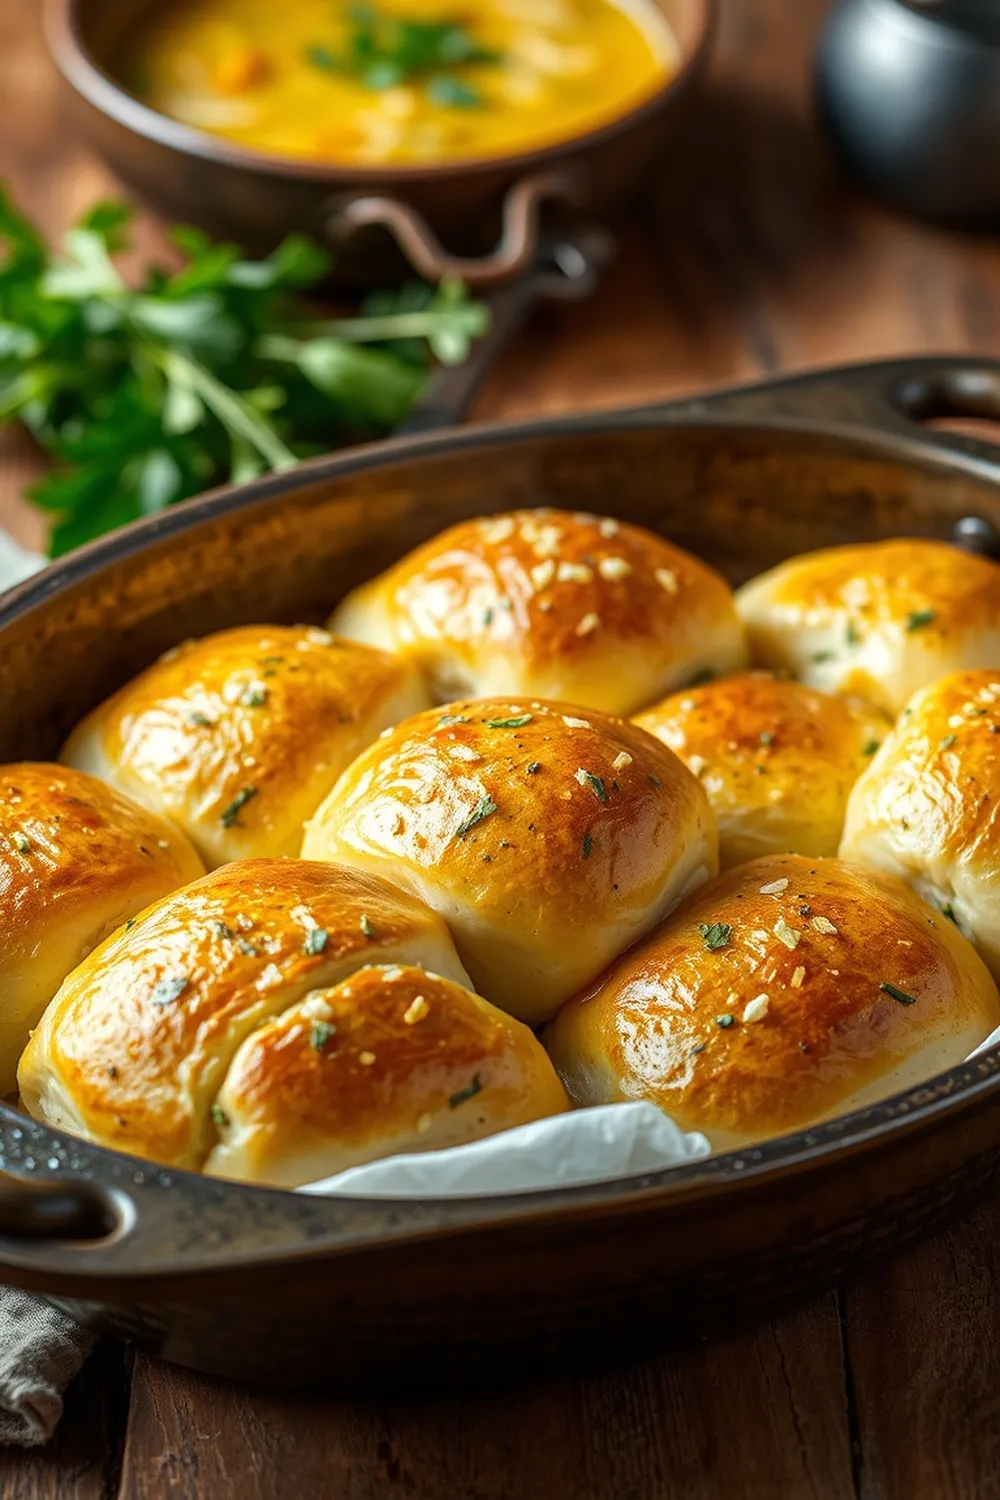
- Second rise & Bake: Arrange the rolls cut-side up in a greased baking pan. Brush the tops with any remaining garlic butter. Cover and let them rise for another 30-40 minutes. Preheat your oven to 180°C (356°F). Bake for 30-35 minutes, or until the rolls are golden brown and sound hollow when tapped.
Expert Tips
- Don’t over-knead the dough, or the rolls will be tough.
- Make sure the water isn’t too hot when proofing the yeast, or it will kill it. Lukewarm is perfect.
- For extra flavour, brush the baked rolls with a little melted butter or garlic butter immediately after they come out of the oven.
Variations
Vegan Garlic Herb Rolls: This recipe is already easily adaptable! Just ensure you use vegan butter for the garlic butter and you’re good to go.
Gluten-Free Garlic Herb Rolls (Using Gluten-Free Flour Blend): My friend, who’s gluten-free, loves these! Simply substitute the wheat and all-purpose flour with a good quality gluten-free flour blend. You might need to add a little extra liquid to get the right consistency.
Spice Level Adjustment – Adding Chili Flakes: If you like a little heat, add a pinch of red chili flakes to the garlic butter. My family loves a subtle kick!
Festival Adaptations – Christmas & Diwali Serving Suggestions: These rolls are fantastic with a Christmas roast or alongside a Diwali spread. For Christmas, try adding a sprinkle of rosemary to the garlic butter. For Diwali, a touch of garam masala would be divine.
Storage Instructions
These rolls are best enjoyed fresh, but you can store them in an airtight container at room temperature for up to 2 days. To reheat, pop them in the oven for a few minutes or microwave them briefly.
FAQs
What is the best way to proof yeast? Make sure your water is lukewarm (around 105-115°F or 40-46°C) and that the sugar provides food for the yeast. A frothy mixture means it’s working!
Can I use bread flour instead of all-purpose flour? Yes, you can! Bread flour will give the rolls a slightly chewier texture.
Can I make these rolls ahead of time? You can prepare the dough up to the first rise and store it in the refrigerator overnight. Just bring it to room temperature before continuing with the recipe.
What can I substitute for nutritional yeast? If you don’t have nutritional yeast, you can leave it out or try a sprinkle of grated Parmesan cheese (if not vegan).
How can I adjust the garlic flavor intensity? Simply adjust the amount of minced garlic in the garlic butter. Start with less and add more to taste.
Can these rolls be frozen? Yes, you can freeze the baked rolls. Wrap them tightly in plastic wrap and then in foil. They’ll keep for up to 2 months. Reheat in the oven.
Enjoy baking (and eating!) these delicious Garlic Herb Rolls! Let me know in the comments how they turn out for you. Happy cooking!


Neha Deshmukh
Neha holds a B.A. in History with a focus on Indian and world history, including ancient, medieval, and modern periods. At RecipesOfIndia.org — the world’s largest database of Indian recipes — she combines her love for food and history by exploring how India’s past has shaped its culinary traditions.


