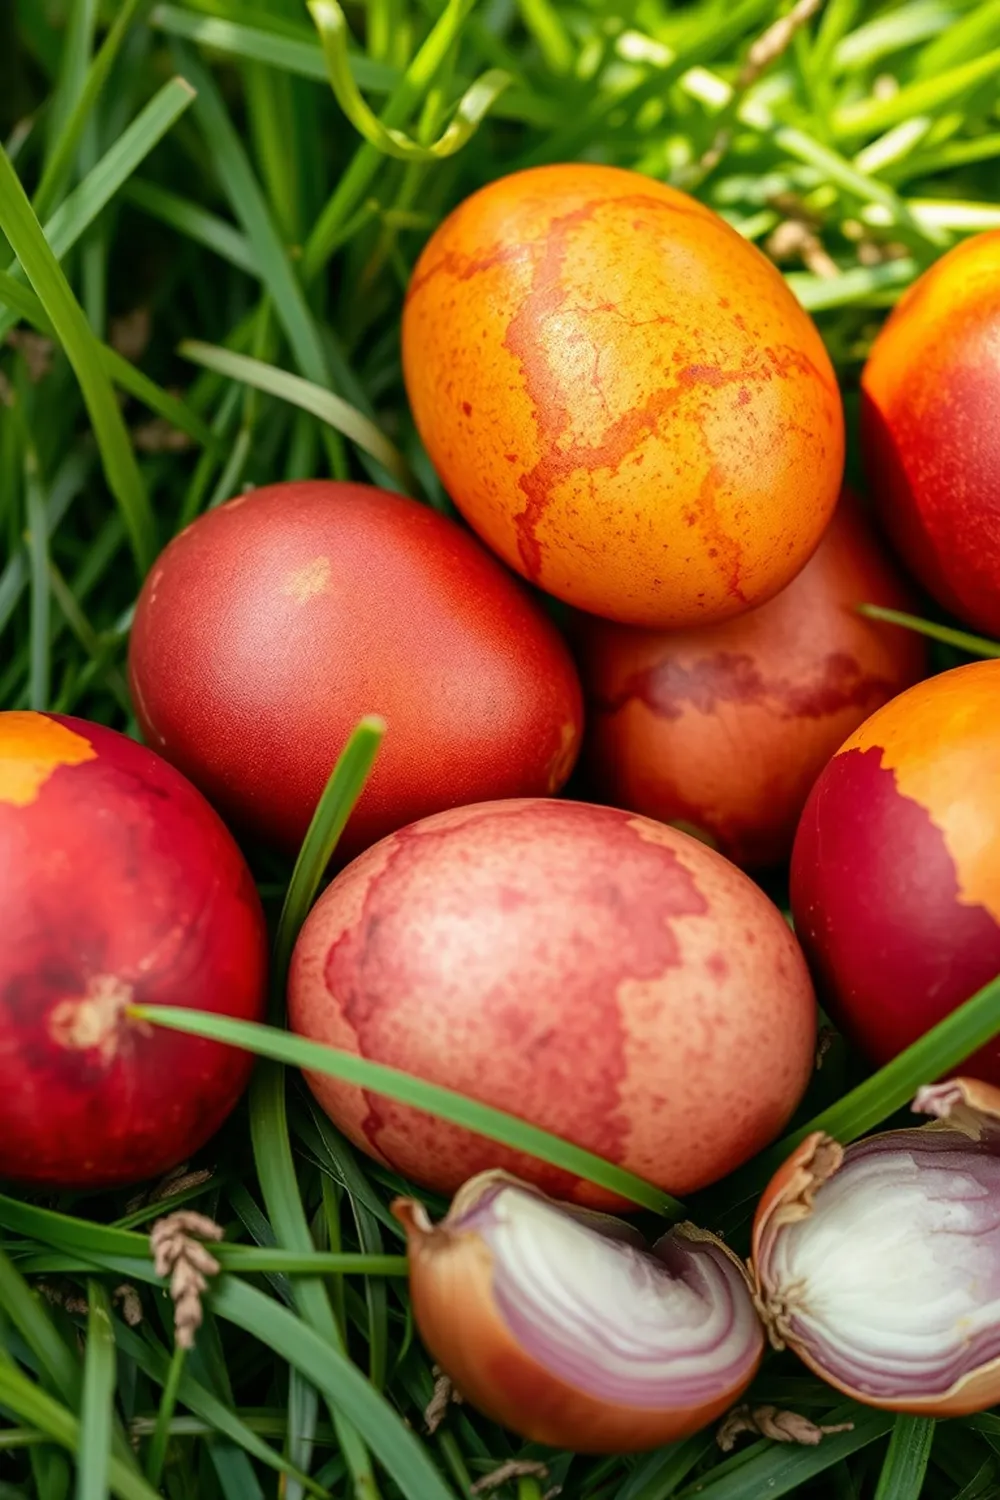
- Collect skins from 5-6 red and yellow onions separately.
- Place each onion skin variety in separate saucepans with 4 cups of water.
- Bring onion skins to a boil for 20-30 minutes, or until the water becomes richly colored.
- Strain and discard the skins, retaining the colored liquid in the pans.
- Add 1 tablespoon of vinegar to each colored liquid.
- Gently place room-temperature eggs into the colored solutions.
- Bring the liquids to a simmer, then cook the eggs for 10-15 minutes.
- Let the eggs cool in the dye for at least 30 minutes, or until the desired color intensity is achieved (longer for deeper color).
- Remove the eggs and pat them dry with paper towels.
- Calories:75 kcal25%
- Energy:313 kJ22%
- Protein:6 g28%
- Carbohydrates:15 mg40%
- Sugar:3 mg8%
- Salt:200 g25%
- Fat:0.5 g20%
Last Updated on 1 month by Neha Deshmukh
Natural Onion-Dyed Easter Eggs Recipe – Vibrant Colors & Technique
Hey everyone! Easter is just around the corner, and I’m so excited to share a really fun, natural way to dye eggs. Forget those artificial kits – we’re going old school with onion skins! I first tried this a few years ago, and honestly, I was amazed by the beautiful, subtle colors you can achieve. Plus, it feels good knowing you’re using something natural and reducing waste. Let’s get started!
Why You’ll Love This Recipe
This isn’t just about pretty eggs; it’s about a little bit of magic. Using onion skins is a fantastic way to repurpose something you’d normally toss. The colors are so unique – think warm, earthy tones instead of super bright, artificial shades. It’s a lovely activity to do with kids, and it’s a great conversation starter about natural dyes and sustainable living. Honestly, it just feels good!
Ingredients
Here’s what you’ll need to create these naturally dyed beauties:
- 5-6 red onion skins (from about 5-6 onions)
- 5-6 yellow onion skins (from about 5-6 onions)
- 4 cups water (approximately 950ml) – divided into two batches
- 1 tablespoon vinegar (approximately 15ml) – divided into two batches
- 8 eggs
Ingredient Notes
Let’s talk about these ingredients for a sec. Onion skins are the star here! Don’t worry about the type of red or yellow onions – any variety will work, though different onions will give slightly different shades. I’ve found that the skins from stronger-flavored onions tend to produce richer colors.
Speaking of regional variations, in India, we have so many incredible onion varieties! From the small, sweet shallots to the larger, more pungent red onions, each one will lend its unique character to the dye.
And vinegar? It’s not just for taste! The acidity helps the color bind to the eggshell, giving you a more vibrant and lasting hue. White vinegar works best, but apple cider vinegar will also do in a pinch.
Step-By-Step Instructions
Alright, let’s get dyeing! It’s easier than you think.
- First, collect those onion skins! Separate the red and yellow skins into two different piles.
- Place each pile of onion skins into separate saucepans. Add 4 cups (950ml) of water to each pan.
- Bring the water to a boil, then reduce the heat and simmer for about 5-6 minutes. You’ll see the water transform into a beautiful, rich color.
- Carefully strain the liquid through a sieve or cheesecloth, discarding the onion skins. You should now have two pots of colored water – one reddish and one yellowish.
- Add 1 tablespoon (15ml) of vinegar to each pot of colored water. This is key for setting the color!
- Gently place your room-temperature eggs into the colored liquids. Make sure they’re fully submerged.
- Bring the liquids back to a boil, then reduce the heat and simmer for 12 minutes.
- Turn off the heat and let the eggs steep in the dye until they reach your desired color intensity. The longer they sit, the deeper the color will become. I usually leave mine for at least an hour, sometimes even overnight in the fridge!
- Remove the eggs from the dye and pat them dry with paper towels. And there you have it – naturally dyed Easter eggs!
Expert Tips
- Room Temperature Eggs: Using room temperature eggs helps them absorb the color more evenly.
- Gentle Handling: Be gentle when placing the eggs in the dye to avoid cracking.
- Color Variation: Don’t be afraid to experiment! You can mix and match colors by partially dyeing eggs in one color and then another.
- Shiny Finish: A light coating of vegetable oil after drying will give your eggs a lovely sheen.
Variations
Let’s get creative!
- Vegan Adaptation: If you’re looking for a plant-based option, you can use vegan egg alternatives made from tofu or potatoes. The dyeing process will be the same, but the color absorption might vary.
- Gluten-Free: This recipe is naturally gluten-free!
- Spice Level: N/A – this is all about color!
- Festival Adaptations: In India, we love color! This technique could be adapted for Holi, the festival of colors, by using different vegetable dyes to create a rainbow of shades. You could even use turmeric for a vibrant yellow!
Serving Suggestions
Honestly, these eggs are beautiful enough to just display! But if you’re planning an Easter brunch, they’ll look stunning as part of the spread. Serve them alongside some delicious Indian breakfast dishes like poha or upma for a truly festive meal.
Storage Instructions
Dyed eggs should be stored in the refrigerator. They’re best consumed within one week.
FAQs
Let’s answer some common questions:
- How do different onion varieties affect the egg color? Different onions will produce slightly different shades. Red onions generally give a reddish-brown hue, while yellow onions create a more golden-yellow color.
- Can I use other types of vegetable scraps for dyeing? Absolutely! Beetroot, spinach, and turmeric are all great options for natural dyeing.
- What if my eggs aren’t taking on color? Make sure your eggs are room temperature and that you’re using enough vinegar. You can also try letting them steep in the dye for a longer period.
- How long can dyed eggs be stored? Dyed eggs should be stored in the refrigerator and are best consumed within one week.
- Is this method safe for consumption after dyeing? Yes, it is! The onion dye is completely natural and safe to eat.
I hope you enjoy this recipe as much as I do! It’s a fun, eco-friendly way to add a touch of natural beauty to your Easter celebrations. Happy dyeing!


Neha Deshmukh
Neha holds a B.A. in History with a focus on Indian and world history, including ancient, medieval, and modern periods. At RecipesOfIndia.org — the world’s largest database of Indian recipes — she combines her love for food and history by exploring how India’s past has shaped its culinary traditions.


