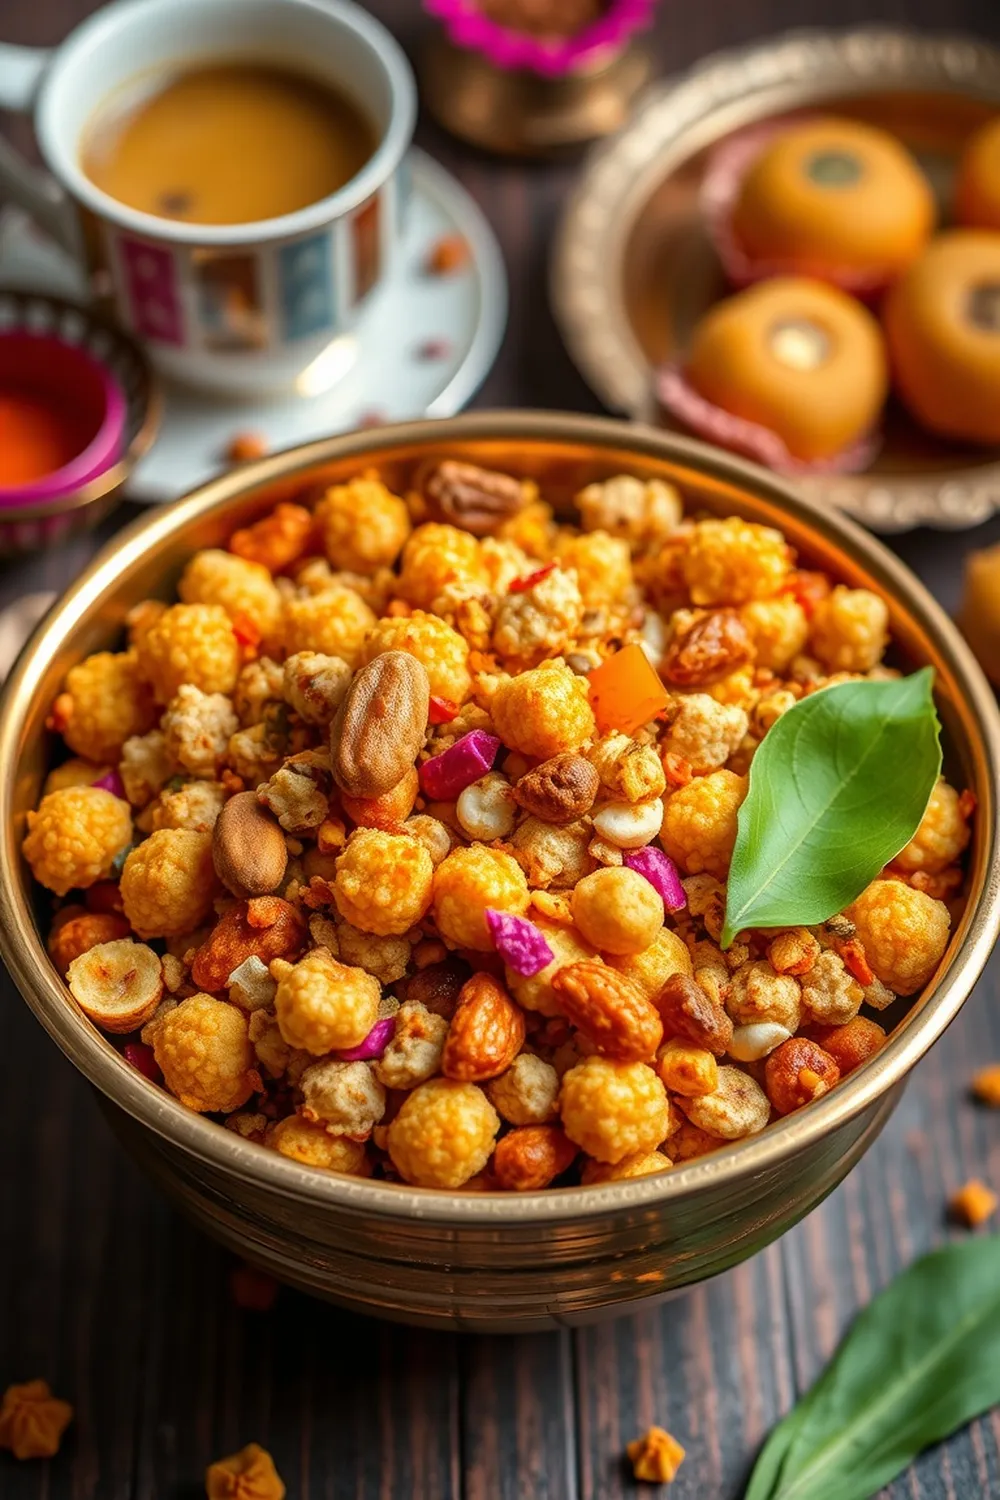
- Prepare Omapodi and Kara Boondi according to their respective recipes, using minimal salt in the Boondi.
- Heat ghee in a pan. Fry the cashews (broken) until golden brown, followed by peanuts and fried gram dal. Stir continuously over medium heat.
- Add curry leaves and fry briefly. Quickly fry the aval (poha) until crisp, working in batches if necessary.
- Transfer all fried ingredients to a bowl. Add salt, red chili powder, and asafoetida. Toss to combine well.
- Gently mix in the Kara Boondi and broken Omapodi. Allow to cool completely before proceeding.
- Add sugar and mix thoroughly. Store in an airtight container for up to 1 week.
- Calories:520 kcal25%
- Energy:2175 kJ22%
- Protein:10 g28%
- Carbohydrates:55 mg40%
- Sugar:5 mg8%
- Salt:300 g25%
- Fat:30 g20%
Last Updated on 2 months by Neha Deshmukh
Omapodi & Kara Boondi Mixture Recipe – Easy Indian Snack
Introduction
Oh, this mixture! It’s the snack in my family. Seriously, whenever there’s a get-together, someone always requests this. It’s a delightful mix of textures and flavors – crunchy, spicy, and just a little bit sweet. I first made this for Diwali a few years ago, and it’s been a tradition ever since. It’s surprisingly easy to whip up, and honestly, it’s way better than anything you can buy in a store. Let’s get started, shall we?
Why You’ll Love This Recipe
This Omapodi & Kara Boondi Mixture is a winner for so many reasons! It’s incredibly moreish – you just can’t stop at a handful. It’s perfect for tea time, as a movie snack, or even to offer guests. Plus, it’s customizable! You can adjust the spice level to your liking, and even add your favorite nuts and dried fruits. It’s a fantastic way to enjoy a little taste of India at home.
Ingredients
Here’s what you’ll need to make about 3 cups of this delicious mixture:
- 1.5 cup Omapodi
- 1.5 cup Kara Boondi
- 0.25 cup Peanuts
- 0.25 cup Fried Gram Dal (also known as Potaikai Kadalai)
- 12 Cashews
- 0.5 cup Aval (Poha) – flattened rice
- 2 sprig Curry Leaves
- 0.5 teaspoon Salt (adjust to taste)
- 1 teaspoon Red Chilli Powder (adjust to taste)
- 0.5 teaspoon Sugar
- 3 tablespoon Ghee
- 0.125 teaspoon Asafoetida (Hing)
Ingredient Notes
Let’s talk ingredients! A few little tips can make all the difference.
- Omapodi & Kara Boondi – Regional Variations & Homemade vs. Store-Bought: You can find both of these readily available in Indian grocery stores. If you’re feeling ambitious, you can absolutely make them from scratch! Homemade always tastes best, but store-bought is perfectly fine for a quick snack.
- Peanuts & Fried Gram Dal – Importance of Roasting: Roasting these brings out their flavour. Don’t skip this step!
- Aval (Poha) – Choosing the Right Type for Crispness: Use the medium-thickness poha for the best crispness. The thinner variety tends to get soggy.
- Ghee – Traditional Flavor vs. Oil Substitutions: Ghee adds a wonderful richness and aroma. However, you can substitute with vegetable oil if you prefer, but the flavour won’t be quite the same.
- Curry Leaves – Fresh vs. Dried & Regional Differences: Fresh curry leaves are always best! They have a much more vibrant flavour. If you can’t find fresh, dried will do in a pinch, but use about half the amount.
- Spices – Adjusting Spice Levels & Quality of Red Chilli Powder: The amount of red chilli powder is totally up to you. Start with 1 teaspoon and add more if you like it spicier. Using a good quality red chilli powder makes a big difference in the flavour and colour. Kashmiri chilli powder gives a lovely colour with mild heat.
Step-By-Step Instructions
Alright, let’s get cooking!
- First, prepare your Omapodi and Kara Boondi according to their respective recipes. Remember to use minimal salt in the boondi, as we’ll be adding more later.
- Heat the ghee in a pan over medium heat. Add the cashews and fry until they turn golden brown. Then, add the peanuts and fried gram dal. Stir continuously to prevent burning.
- Once the peanuts and dal are lightly browned, add the curry leaves and fry for just a few seconds until fragrant.
- Now, add the aval (poha) and fry until it’s crisp. Work in batches if necessary to avoid overcrowding the pan. This is key to getting it nice and crunchy!
- Transfer all the fried ingredients to a large bowl. Add the salt, red chilli powder, and asafoetida. Toss everything together really well to make sure it’s evenly coated.
- Gently mix in the Kara Boondi and broken Omapodi.
- Finally, add the sugar and mix thoroughly.
- Let the mixture cool completely before storing it in an airtight container. This is important – if you store it while it’s still warm, it might get soggy.
Expert Tips
A few little secrets to make this mixture perfect every time:
- Achieving the Perfect Crispness: The key is to fry everything separately and ensure each ingredient is thoroughly dried before mixing.
- Preventing the Mixture from Becoming Stale: Store in an airtight container at room temperature.
- Adjusting Spice Levels to Your Preference: Taste as you go! Add more red chilli powder if you like it hotter.
- Working in Batches for Even Frying: Don’t overcrowd the pan. Frying in batches ensures everything gets crispy.
- Cooling Completely Before Storing: This prevents condensation and keeps the mixture crunchy.
Variations
Want to switch things up? Here are a few ideas:
- Vegan Adaptation: Substitute the ghee with vegetable oil.
- Gluten-Free Adaptation: This recipe is naturally gluten-free! Just double-check the labels of your store-bought Omapodi and Kara Boondi to ensure they haven’t been processed in a facility that also handles gluten.
- Spice Level Adjustment (Mild, Medium, Hot): Adjust the amount of red chilli powder to suit your taste. A pinch of turmeric powder can also add a lovely colour and subtle flavour.
- Festival Adaptations (Diwali, Janmashtami): My aunt always adds a handful of dried cranberries for Diwali – it’s a beautiful festive touch!
- Adding Dried Fruits & Nuts: Feel free to add raisins, chopped almonds, or pistachios for extra flavour and texture.
Serving Suggestions
This mixture is fantastic on its own with a cup of chai. It’s also great to serve alongside other snacks for parties or gatherings. My kids love to take it to school as a treat!
Storage Instructions
Store the Omapodi & Kara Boondi Mixture in an airtight container at room temperature for up to 1 week. It tends to lose its crispness after that, so it’s best enjoyed fresh.
FAQs
Let’s answer some common questions:
- What is the shelf life of this Omapodi & Kara Boondi Mixture? About a week, stored in an airtight container.
- Can I make this mixture ahead of time for a party? Yes, you can make it 2-3 days in advance. Just make sure to store it properly.
- What can I substitute for ghee in this recipe? Vegetable oil works well, but the flavour won’t be quite as rich.
- How do I ensure the poha gets crispy and not soggy? Fry it in batches and make sure it’s completely dry before adding it to the mixture.
- Is it possible to adjust the salt level in the boondi and omapodi beforehand? Absolutely! Using less salt in the initial preparation allows you to control the overall saltiness of the mixture.


Neha Deshmukh
Neha holds a B.A. in History with a focus on Indian and world history, including ancient, medieval, and modern periods. At RecipesOfIndia.org — the world’s largest database of Indian recipes — she combines her love for food and history by exploring how India’s past has shaped its culinary traditions.


