- Prepare the leaven by mixing sourdough starter, bread flour, rye flour, and water. Let it rest for 4-5 hours, or until doubled in size.
- Autolyse the flour by combining bread flour, rye flour, and water. Rest for 30-60 minutes.
- Incorporate the leaven into the autolysed dough. Add salt and the remaining water 30 minutes after mixing the autolyse.
- Perform stretch-and-fold sessions every 30-60 minutes for 2-3 hours to strengthen the dough.
- Laminate the dough by spreading it into a thin sheet, then adding roasted garlic and Asiago cheese. Fold into layers, then continue bulk fermentation.
- Perform coil folds at 30-60 minute intervals to further develop gluten structure.
- Shape the dough into a boule, place in a proofing basket, and refrigerate overnight (8-12 hours).
- Preheat oven to 500°F (260°C). Score the dough and bake in a Dutch oven for 20 minutes covered.
- Reduce heat to 450°F (232°C), remove lid, and bake for 15-25 minutes until deeply caramelized.
- Cool completely on a wire rack before slicing.
- Calories:196 kcal25%
- Energy:820 kJ22%
- Protein:8 g28%
- Carbohydrates:34 mg40%
- Sugar:1 mg8%
- Salt:428 g25%
- Fat:3 g20%
Last Updated on 4 months by Neha Deshmukh
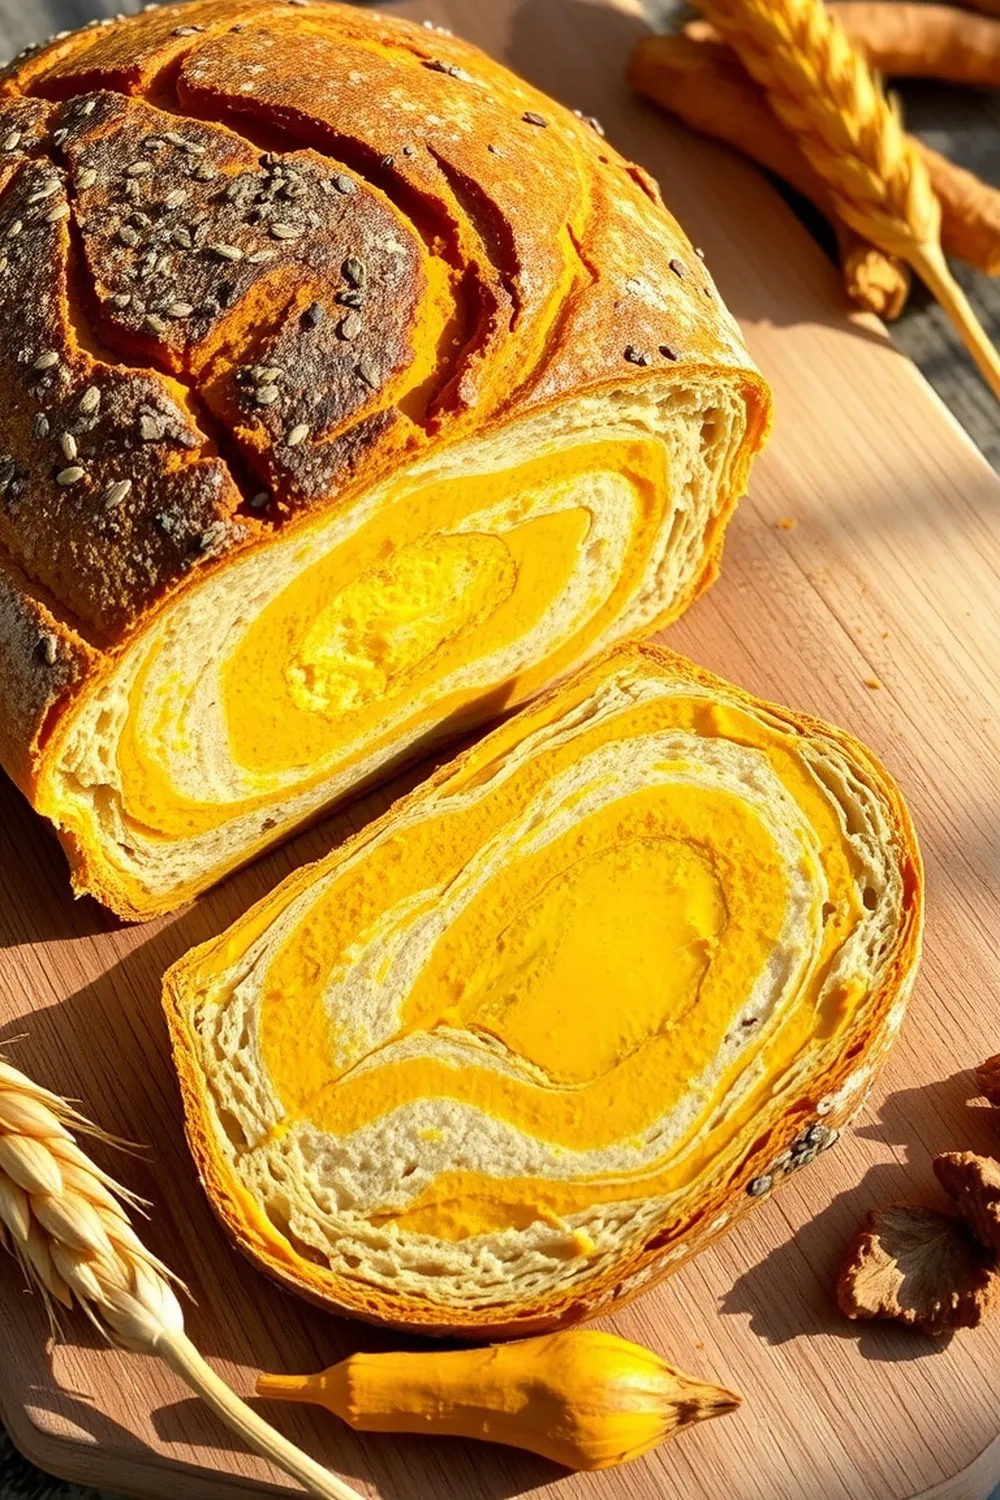
Roasted Garlic & Asiago Sourdough Bread Recipe – Step-by-Step Guide
Hey everyone! There’s just something magical about the smell of freshly baked sourdough wafting through the house, isn’t there? I’ve been experimenting with sourdough for years, and this Roasted Garlic & Asiago Sourdough is a recent obsession. It’s a little bit of work, yes, but the incredible flavour and satisfying chew are so worth it. Let’s get baking!
Why You’ll Love This Recipe
This isn’t your average sourdough. The roasted garlic adds a beautiful sweetness that balances the tang of the sourdough, and the Asiago cheese brings a lovely nutty, salty bite. It’s perfect for a weekend brunch, a cozy dinner with friends, or just a special treat for yourself. Trust me, one slice and you’ll be hooked!
Ingredients
Here’s what you’ll need to create this masterpiece:
- 15g sourdough starter
- 40g bread flour
- 10g rye flour
- 50g water
- 400g bread flour
- 30g rye flour
- 100g leavain (active sourdough starter)
- 330g water
- 87g roasted garlic
- 100g Asiago Cheese
- 9g salt
Ingredient Notes
Let’s talk ingredients! Getting these right will make all the difference.
Sourdough Starter: Understanding Activity & Maintenance
Your sourdough starter is the heart and soul of this bread. It needs to be active and bubbly! I usually feed mine 4-6 hours before I plan to bake, ensuring it’s doubled in size. If it’s sluggish, give it a couple of extra feeds.
Bread Flour vs. All-Purpose Flour: What’s the Difference?
Bread flour has a higher protein content than all-purpose flour, which means it develops more gluten. More gluten = a chewier, more structured loaf. You can use all-purpose in a pinch, but your bread won’t have quite the same rise and texture.
Rye Flour: Exploring Flavor & Texture Contributions
Rye flour adds a wonderful depth of flavour and a slightly denser texture. Don’t be afraid to experiment with different types of rye flour – light, medium, or dark – to find your preference.
Asiago Cheese: Regional Variations & Flavor Profiles
Asiago is a fantastic cheese for baking. It’s firm, slightly granular, and has a lovely nutty flavour. It originates from the Veneto region of Italy. If you can’t find Asiago, Parmesan is a good substitute, though the flavour will be a little different.
Roasted Garlic: Preparing for Maximum Flavor
Roasting the garlic mellows its flavour and makes it wonderfully sweet and spreadable. I like to roast a whole head of garlic at a time and keep it in the fridge for easy use. Simply drizzle a head of garlic (cut in half horizontally) with olive oil, wrap in foil, and roast at 400°F (200°C) for about 45-60 minutes, or until soft and golden.
Step-By-Step Instructions
Alright, let’s get down to business!
- Prepare the Leaven: In a small bowl, combine the 15g sourdough starter, 40g bread flour, 10g rye flour, and 50g water. Mix well, cover, and let it rest for 4-5 hours, or until doubled in size. This is your leaven – the engine that will drive your bread.
- Autolyse the Dough: In a large bowl, combine the 400g bread flour, 30g rye flour, and 330g water. Mix until just combined – don’t overmix! Cover and let it rest for 30 minutes. This process, called autolysing, helps the flour hydrate and develop gluten.
- Incorporate the Leaven: Add the 100g leavain to the autolysed dough. After 30 minutes, add the 9g salt and remaining water. Mix everything together until well combined.
- Stretch and Folds: This is where the magic happens! Perform stretch-and-fold sessions every hour for 2 hours. To do this, gently stretch a portion of the dough upwards and fold it over onto itself. Rotate the bowl and repeat this process 4-5 times. This strengthens the gluten and develops the dough’s structure.
- Laminate with Garlic & Cheese: Gently spread the dough into a thin rectangle. Sprinkle with the 87g roasted garlic and 100g Asiago cheese. Fold the dough into layers, like a croissant.
- Coil Folds: Continue to develop the gluten structure with coil folds at 1-hour intervals for another 1-2 hours.
- Bulk Fermentation & Cold Proof: Shape the dough into a boule (a round loaf), place it in a well-floured proofing basket, and refrigerate overnight (up to 14 hours). This slow, cold proof develops flavour and makes the dough easier to handle.
- Bake: Preheat your oven to 500°F (260°C) with your Dutch oven inside. Carefully remove the hot Dutch oven, place the dough inside (score the top with a sharp knife or lame), cover, and bake for 15 minutes.
- Finish Baking: Reduce the oven temperature to 450°F (232°C), remove the lid of the Dutch oven, and bake for another 15-20 minutes, or until the crust is deeply caramelized and golden brown.
- Cool: Let the bread cool completely on a wire rack before slicing. This is the hardest part, I know! But trust me, it’s worth the wait.
Expert Tips
- Achieving Optimal Dough Hydration: Don’t be afraid to adjust the water slightly depending on your flour and the humidity. The dough should be slightly sticky but manageable.
- Understanding Gluten Development Through Stretch & Folds: Stretch and folds are crucial for building strength in your dough. Be gentle but thorough.
- The Importance of a Cold Proof: The cold proof slows down fermentation, allowing flavours to develop and making the dough easier to score.
- Scoring Techniques for Beautiful Bread: Scoring allows the bread to expand during baking. A sharp knife or lame is essential. Experiment with different patterns!
- Dutch Oven Baking: Why It Works: The Dutch oven creates a steamy environment, which helps the bread rise and develop a crispy crust.
Variations
- Vegan Asiago Sourdough: Substitute the Asiago cheese with a vegan Parmesan alternative.
- Gluten-Free Adaptation: Use a gluten-free bread flour blend designed for sourdough. You may need to adjust the hydration.
- Spice Level: Add a pinch of chili flakes or some chopped fresh herbs (rosemary, thyme) to the dough for extra flavour. My friend Sarah loves adding a teaspoon of fennel seeds!
- Festival Adaptation: During the holidays, I sometimes add dried cranberries and chopped walnuts for a festive twist.
Serving Suggestions
This bread is amazing on its own, but it’s also fantastic with:
- A simple smear of butter
- A drizzle of olive oil and a sprinkle of sea salt
- Your favourite soup or stew
- As a base for bruschetta
Storage Instructions
Store leftover bread in an airtight container at room temperature for up to 3 days, or freeze for longer storage.
FAQs
What is the ideal temperature for my sourdough starter?
Ideally, your starter should be kept between 70-75°F (21-24°C).
Can I use a different type of cheese instead of Asiago?
Yes! Parmesan, Gruyère, or even a sharp cheddar would work well.
How do I know when my sourdough is properly proofed?
The dough should be slightly puffy and spring back slowly when gently poked.
What if I don’t have a Dutch oven?
You can bake the bread on a baking sheet with a tray of water underneath to create steam.
Can I freeze this sourdough bread?
Absolutely! Wrap it tightly in plastic wrap and then in foil. It will keep for up to 3 months.
Happy baking! I hope you enjoy this recipe as much as I do. Let me know how it turns out in the comments below!


Neha Deshmukh
Neha holds a B.A. in History with a focus on Indian and world history, including ancient, medieval, and modern periods. At RecipesOfIndia.org — the world’s largest database of Indian recipes — she combines her love for food and history by exploring how India’s past has shaped its culinary traditions.