- Soak black beans, chickpeas, and kidney beans overnight. Pressure cook until tender (about 4-5 whistles).
- Heat olive oil in a pot. Sauté onions for 3 minutes, then add green chili, bell peppers, and celery. Cook for 3 more minutes.
- Add minced garlic and ginger. Stir for 1-2 minutes until fragrant.
- Mix in salt, chili powder, coriander, cumin, oregano, thyme, turmeric, and garam masala. Add tomatoes and cook until softened (about 5-7 minutes).
- Stir in cooked beans, zucchini, and vegetable stock. Bring to a boil.
- Simmer uncovered for 20-30 minutes on medium-low heat, stirring occasionally.
- Remove from heat. Fold in fresh cilantro and adjust seasoning to taste.
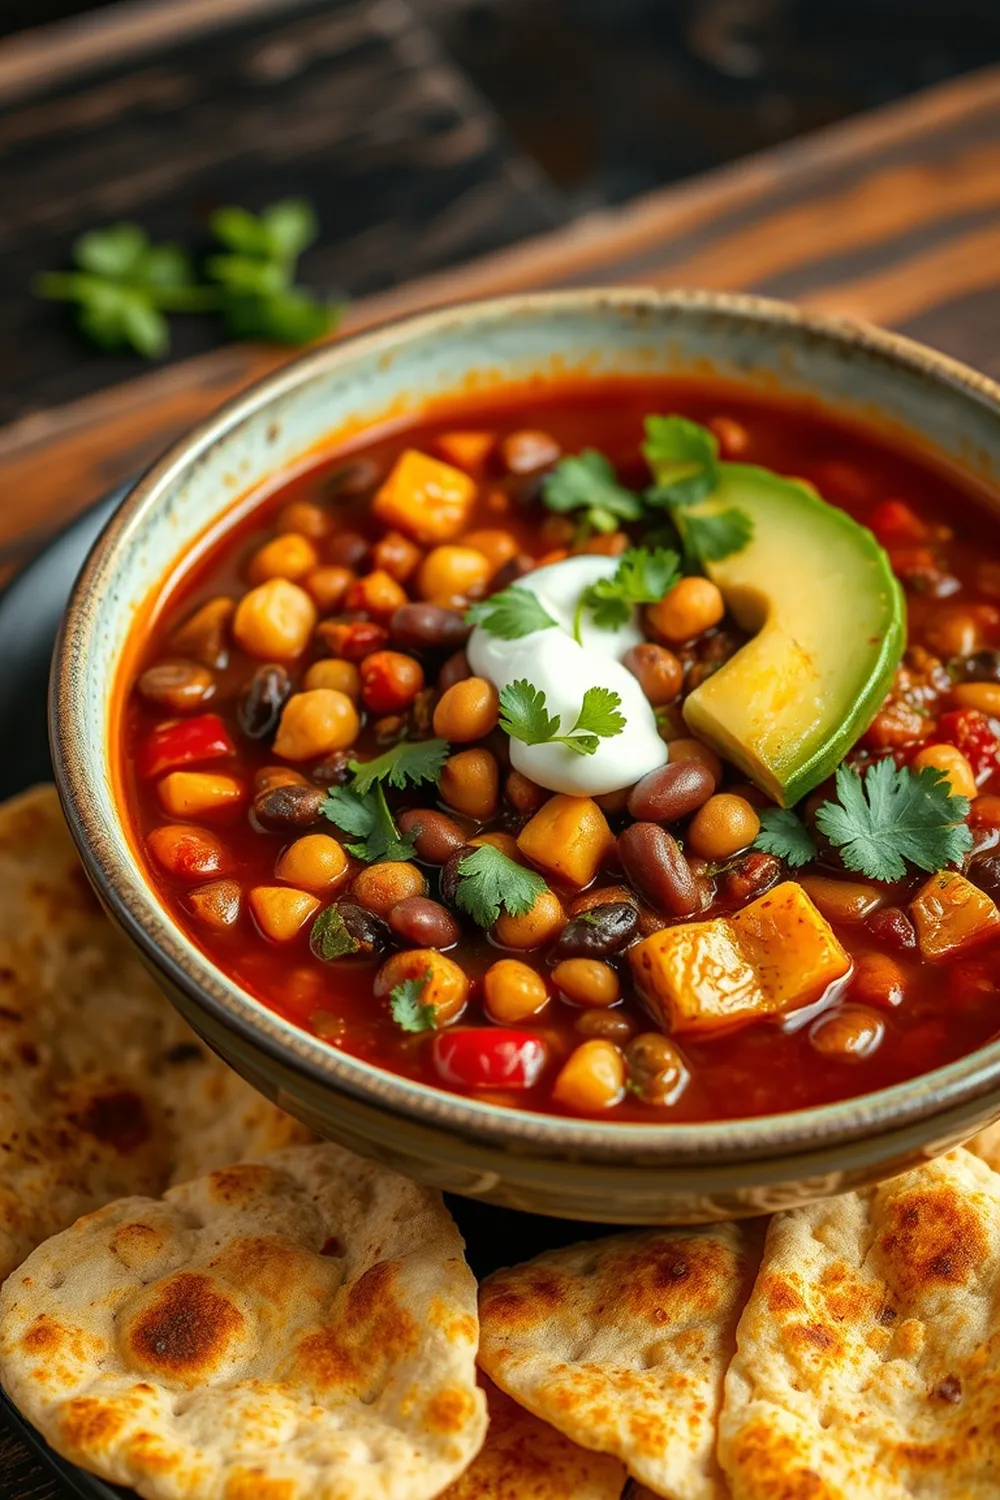
- Serve over brown rice with avocado, sour cream/yogurt, and Indian flatbread.
- Calories:140 kcal25%
- Energy:585 kJ22%
- Protein:5 g28%
- Carbohydrates:20 mg40%
- Sugar:7 mg8%
- Salt:804 g25%
- Fat:6 g20%
Last Updated on 4 months by Neha Deshmukh
Three Bean Chili Recipe – Zucchini, Ginger & Garam Masala
Hey everyone! If you’re anything like me, you love a hearty, flavorful chili, especially when the weather starts to cool down. But this isn’t just any chili. This Three Bean Chili is packed with goodness – a beautiful blend of beans, fresh veggies, and a warm hug of Indian spices, thanks to the magic of garam masala and fresh ginger. I first made this a few years ago, experimenting with flavors, and it’s been a family favorite ever since! It’s surprisingly easy to make, and the aroma while it simmers is just divine.
Why You’ll Love This Recipe
This chili is a little different, and that’s what makes it special! It’s a comforting, flavorful twist on a classic. Here’s why you’ll adore it:
- Flavor Explosion: The combination of beans, zucchini, and Indian spices creates a truly unique and delicious flavor profile.
- Nutrient-Rich: Packed with protein, fiber, and vitamins, it’s a healthy and satisfying meal.
- Easy to Make: Despite the complex flavors, it’s a straightforward recipe that anyone can tackle.
- Versatile: Perfect for a cozy weeknight dinner, a potluck, or even meal prepping for the week.
Ingredients
Here’s what you’ll need to bring this chili to life:
- 2 tablespoons olive oil (approximately 30ml)
- 1 cup chopped red onions (about 150g)
- 1 cup chopped green bell peppers (about 150g)
- 3 minced garlic cloves
- 2 Thai green chili, pieces (adjust to your spice preference!)
- 1 medium zucchini, piece (about 200g)
- 1 cup chopped celery (about 100g)
- Tablespoons chili powder (start with 1-2, to taste)
- 1 tablespoon ground coriander
- 1 teaspoon cumin powder (about 5g)
- 1 teaspoon dried oregano
- 1 teaspoon dried thyme
- 1 inch fresh ginger, grated
- 1 teaspoon turmeric (about 5g)
- 1-2 teaspoons salt (to taste)
- 1 teaspoon garam masala
- 4 large tomatoes, pieces (about 600g)
- 1 ½ cups cooked black beans (about 200g)
- 1 ½ cups cooked chickpeas (about 200g)
- 1 ½ cups cooked kidney beans (about 200g)
- 1 ½ cup vegetable stock (about 350ml)
- 2 tablespoons chopped fresh cilantro (about 15g)
Ingredient Notes
Let’s talk ingredients! A few things to keep in mind:
- Garam Masala: This is the star spice blend! It’s a warm, fragrant mix that adds incredible depth. Don’t skip it – it really makes this chili sing. You can find it in most supermarkets or Indian grocery stores.
- The Bean Blend: I love the combination of black beans, chickpeas, and kidney beans for their different textures and flavors. Feel free to experiment with other beans you enjoy!
- Fresh Ginger: Seriously, use fresh ginger. It adds a brightness and zing that powdered ginger just can’t match. Grate it finely for the best flavor distribution.
- Spice Level: Thai green chilies can be quite hot! Start with one and add more to taste. You can also remove the seeds for a milder heat.
Step-By-Step Instructions
Alright, let’s get cooking!
- Soak the Beans: Start by soaking your black beans, chickpeas, and kidney beans overnight in plenty of water. This helps them cook evenly and become beautifully tender. The next day, drain and pressure cook them until they’re soft – usually about 4 whistles in a pressure cooker.
- Sauté the Aromatics: Heat the olive oil in a large pot over medium heat. Add the chopped red onions and sauté for about 3 minutes, until they start to soften. Then, toss in the green chili, bell peppers, and celery and cook for another 3 minutes.
- Ginger & Garlic Time: Add the minced garlic and grated ginger to the pot. Stir for about 2 minutes, until fragrant. This is where your kitchen will start to smell amazing!
- Spice it Up: Now for the spices! Add the salt, chili powder, coriander, cumin, oregano, thyme, turmeric, and garam masala. Stir well to coat the vegetables. Add the chopped tomatoes and cook until they soften, about 5-7 minutes.
- Bring it Together: Stir in the cooked beans, chopped zucchini, and vegetable stock. Bring the chili to a boil, then reduce the heat to low.
- Simmer & Develop Flavor: Simmer uncovered for about 30 minutes, stirring occasionally. This allows the flavors to meld and the chili to thicken.
- Finish & Serve: Remove from heat and stir in the fresh cilantro. Give it a final taste and adjust the seasoning if needed.
Expert Tips
- Don’t Rush the Sauté: Taking the time to properly sauté the onions and vegetables builds a flavorful base for the chili.
- Taste as You Go: Seasoning is key! Taste the chili throughout the cooking process and adjust the spices to your liking.
- Low and Slow: Simmering the chili on low heat allows the flavors to develop and deepen.
Variations
- Spicy Kick: For a real heat boost, add a pinch of cayenne pepper or a chopped habanero pepper. My friend, Priya, loves to add a dash of smoked paprika too!
- Sweet Potato Addition: My family loves adding diced sweet potato along with the zucchini for extra sweetness and nutrients.
- Corn & More Veggies: Feel free to throw in some frozen corn, diced carrots, or spinach for added texture and flavor.
Vegan Adaptation
This recipe is already naturally vegan! Just ensure your vegetable stock is vegan-friendly.
Gluten-Free Adaptation
This recipe is also naturally gluten-free.
Spice Level Adjustment (Mild to Hot)
- Mild: Use 1 Thai green chili (seeds removed) or substitute with a milder chili pepper. Reduce chili powder to 1 teaspoon.
- Medium: Use 2 Thai green chilies.
- Hot: Use 3-4 Thai green chilies, or add a pinch of cayenne pepper.
Festival Adaptation
This chili is perfect for cooler months and festivals like Diwali or Lohri! Serve it with warm naan or roti, a dollop of yogurt, and a sprinkle of cilantro. It’s a comforting and festive meal to share with loved ones.
Serving Suggestions
- Over brown rice for a wholesome meal.
- With a dollop of sour cream or plain yogurt.
- Topped with sliced avocado for creaminess.
- Served with warm Indian flatbread (roti, naan, or paratha).
- A sprinkle of chopped cilantro for freshness.
Storage Instructions
- Refrigerator: Store leftover chili in an airtight container in the refrigerator for up to 3-4 days.
- Freezer: For longer storage, freeze the chili in freezer-safe containers for up to 2-3 months.
FAQs
What is the best way to soak the beans for optimal texture?
Soak the beans in plenty of water overnight. You can also do a quick soak by boiling them for 2 minutes, then letting them sit for an hour.
Can I use canned beans instead of cooking them from scratch?
Yes, you can! Just drain and rinse the canned beans before adding them to the chili. You’ll need about 4 cans (15oz/425g each).
What other vegetables can I add to this chili?
Feel free to add diced carrots, sweet potatoes, corn, or spinach.
How can I adjust the thickness of the chili?
If the chili is too thick, add more vegetable stock. If it’s too thin, simmer it uncovered for a longer period to allow some of the liquid to evaporate.
Is Garam Masala essential to the flavor profile, and can it be substituted?
Garam masala is highly recommended! It’s what gives this chili its unique Indian flavor. If you absolutely can’t find it, you can try a blend of cumin, coriander, cardamom, and cinnamon, but it won’t be quite the same.
Enjoy! I hope you love this Three Bean Chili as much as my family does. Let me know in the comments how it turns out for you!


Neha Deshmukh
Neha holds a B.A. in History with a focus on Indian and world history, including ancient, medieval, and modern periods. At RecipesOfIndia.org — the world’s largest database of Indian recipes — she combines her love for food and history by exploring how India’s past has shaped its culinary traditions.


