- Soak urad dal for 2-3 hours. Drain and grind with green chilies, ginger, and water to a smooth batter.
- Mix rice flour, salt, and hing into the batter for crispiness.
- Heat an appe pan, add oil to each mold, and pour batter into the molds. Cover and cook on low heat until golden brown.
- Flip the vadas, add more oil if needed, and cook until fully done and crispy.
- Soak the cooked vadas in warm water for 5 minutes, then gently squeeze out excess moisture.
- Whisk yogurt with salt and water to a smooth, coating consistency.
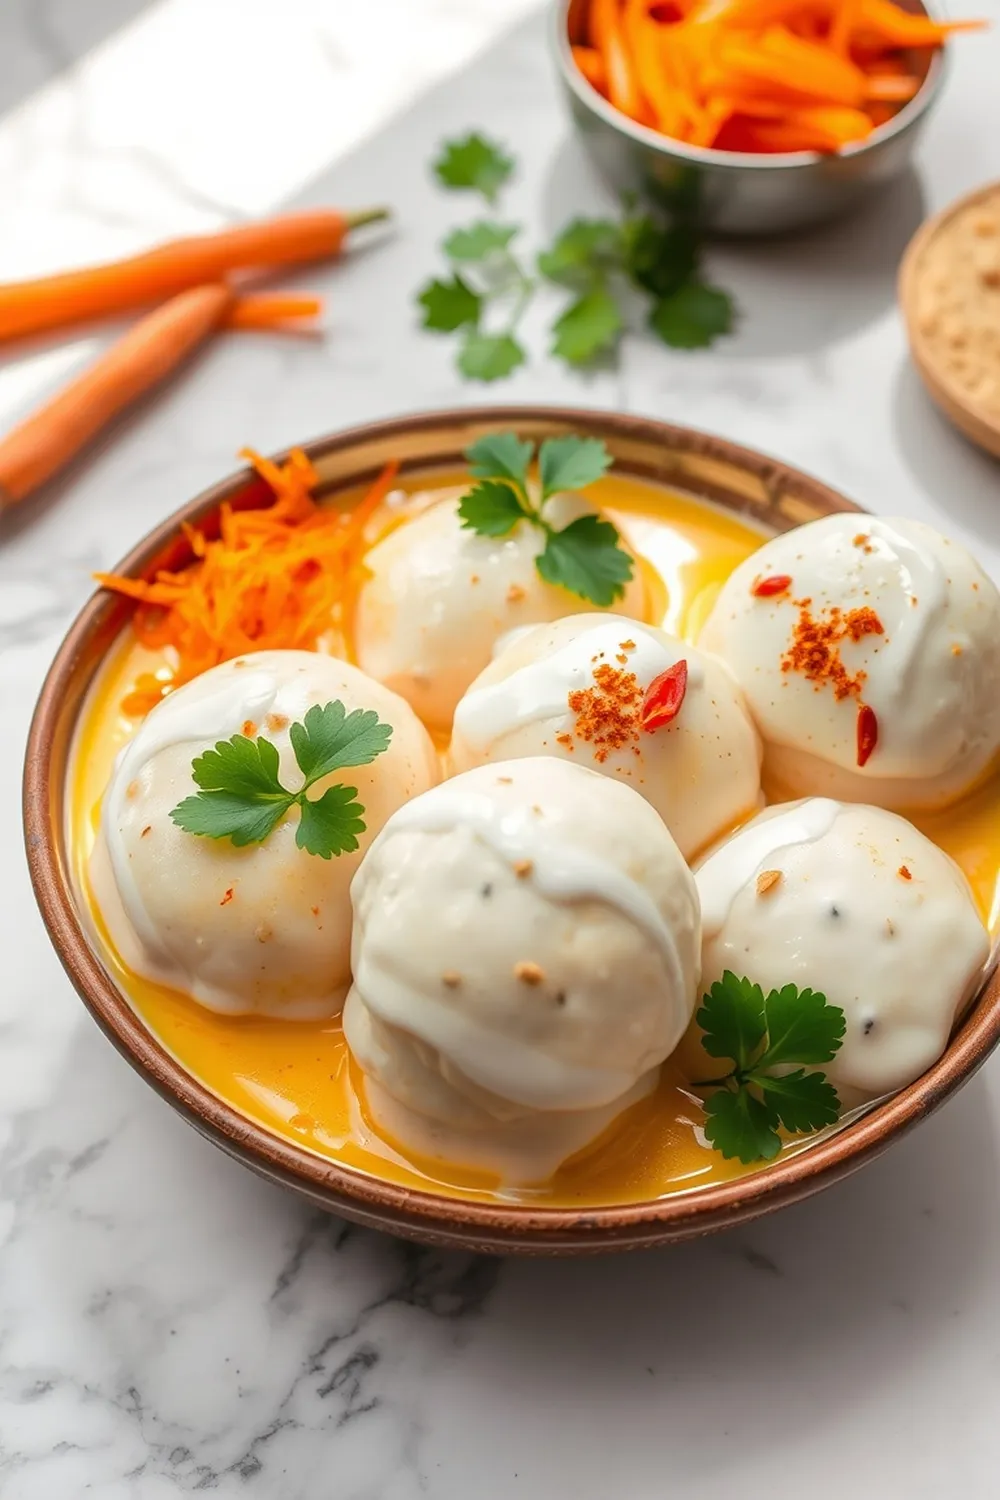
- Arrange the softened vadas in a serving dish, and pour the yogurt mixture over them.
- Top with grated carrots, coriander leaves, and chili powder.
- Temper mustard seeds and curry leaves in oil, and drizzle the tempering over the vadas.
- Chill for at least 30 minutes before serving, garnished with kara boondi.
- Calories:120 kcal25%
- Energy:502 kJ22%
- Protein:5 g28%
- Carbohydrates:15 mg40%
- Sugar:3 mg8%
- Salt:250 g25%
- Fat:5 g20%
Last Updated on 4 months by Neha Deshmukh
Urad Dal Vada Recipe – Soft & Crispy Indian Street Food
Hey everyone! If you’ve ever wandered the bustling streets of India, you’ve probably been captivated by the aroma of freshly fried vadas. These little lentil fritters are the perfect snack – crispy on the outside, fluffy on the inside, and bursting with flavor. Today, I’m sharing my go-to Urad Dal Vada recipe, guaranteed to transport you straight to those vibrant Indian streets. I first made these for a Diwali party years ago, and they were a huge hit!
Why You’ll Love This Recipe
This Urad Dal Vada recipe isn’t just about deliciousness; it’s about capturing that authentic Indian street food experience. They’re surprisingly easy to make, even if you’re new to Indian cooking. Plus, the combination of textures – that satisfying crunch giving way to a soft interior – is simply irresistible. They’re perfect for a quick snack, a festive treat, or even as a side dish with your favorite South Indian meals.
Ingredients
Here’s what you’ll need to create these delightful vadas:
- 1 cup Urad Dal (approximately 175g)
- 1-2 nos Green chillies (adjust to your spice preference)
- 1 inch x 2 pieces Ginger
- ½ tsp Asafoetida (hing)
- 2 tbsp Rice Powder (approximately 15g)
- Water (for soaking & grinding) – about 1 ½ cups
- Oil (for cooking) – about 1-2 liters
- Salt to taste
- Thick Yogurt – about 1 cup (240ml)
- Grated Carrots – for garnish
- Coriander Leaves – chopped, for garnish
- Mustard Seeds (for tempering) – 1 tsp
- Curry Leaves (for tempering) – 7-8 leaves
Ingredient Notes
Let’s talk about a few key ingredients to make sure your vadas turn out perfectly!
Urad Dal: The Heart of the Vada
Urad dal, or black gram, is the star of the show. Make sure you use good quality dal for the best results. It’s what gives the vadas their signature soft texture.
Green Chillies & Ginger: Adjusting the Spice
I usually use 1-2 green chillies, but feel free to adjust this based on how much heat you like. Removing the seeds from the chillies will also tone down the spice. Fresh ginger is a must – it adds a lovely warmth and aroma.
Asafoetida (Hing): A Digestive Aid & Flavor Enhancer
Don’t skip the hing! It might smell a little funky on its own, but it adds a wonderful savory depth to the vadas and aids in digestion. A little goes a long way.
Rice Flour: Achieving the Perfect Crisp
Rice flour is the secret to that lovely crisp exterior. It helps bind the batter and creates a beautiful texture when fried. You can find it easily in most Indian grocery stores.
Regional Variations in Vada Recipes
While this is my family’s recipe, vadas are made all over India, and each region has its own twist! In some parts of South India, they add chopped onions or curry leaves directly into the batter. Others might use a different type of lentil, like chana dal (split chickpeas). Don’t be afraid to experiment and find what you like best!
Step-By-Step Instructions
Alright, let’s get cooking!
- Soak the Dal: Start by soaking the urad dal in plenty of water for at least 2 hours. This is crucial for a smooth batter.
- Grind the Batter: Drain the soaked dal and grind it with the green chillies, ginger, and a little water to form a smooth, fluffy batter. It should be thick but pourable.
- Add the Magic: Now, mix in the rice flour, salt, and hing into the batter. This is where the crispiness begins!
- Heat the Oil: Heat oil in an appe pan (or a deep frying pan) over medium-low heat. Add a little oil to each mold (if using an appe pan).
- Pour & Cook: Carefully pour the batter into the hot oil, filling each mold about ¾ full. Cover and cook for about 3-4 minutes, or until the bottom is golden brown.
- Flip & Finish: Gently flip the vadas and cook for another 2-3 minutes, until they are golden brown and crispy all over. Add a little more oil if needed.
- Soften Them Up: This is a little trick my grandmother taught me! Soak the cooked vadas in warm water for about 5 minutes. This softens them up, making them perfect for the yogurt coating. Gently squeeze out the excess water.
- Yogurt Coating: Whisk the yogurt with a little salt and water until it reaches a smooth, coating consistency.
- Assemble & Garnish: Arrange the softened vadas on a serving dish and generously pour the yogurt mixture over them. Sprinkle with grated carrots, chopped coriander leaves, and a pinch of chili powder.
- Temper & Serve: Heat a little oil in a small pan and temper the mustard seeds until they splutter. Add the curry leaves and pour this tempering over the vadas. Chill for at least 30 minutes before serving, and garnish with kara boondi.
Expert Tips
Here are a few things I’ve learned over the years to make the perfect Urad Dal Vada:
Achieving the Right Batter Consistency
The batter should be thick enough to hold its shape but pourable. If it’s too thick, add a little water. If it’s too thin, add a little more rice flour.
Ensuring Even Cooking
Keep the heat at medium-low to ensure the vadas cook through evenly. If the oil is too hot, they’ll burn on the outside before they’re cooked inside.
The Importance of Soaking
Don’t skimp on the soaking time! It’s essential for a smooth batter and fluffy vadas.
Variations
Vegan Urad Dal Vada
Simply substitute the yogurt with a plant-based yogurt alternative. Coconut yogurt works beautifully!
Gluten-Free Urad Dal Vada
This recipe is naturally gluten-free, as long as you use pure rice flour.
Spice Level Adjustments (Mild, Medium, Hot)
Adjust the number of green chillies to control the spice level. For a milder vada, remove the seeds from the chillies. For a fiery kick, add a pinch of cayenne pepper to the batter.
Festival Adaptations (Ganesh Chaturthi, Diwali)
These vadas are a staple during Indian festivals. You can make a larger batch and serve them as part of a festive spread.
Serving Suggestions
Urad Dal Vadas are delicious on their own, but they’re even better with a side of coconut chutney or sambar. They also make a great accompaniment to a South Indian thali. My friend, Priya, loves to serve them with a cup of hot filter coffee!
Storage Instructions
Leftover vadas can be stored in an airtight container in the refrigerator for up to 2 days. Reheat them in a preheated oven or air fryer to restore their crispiness.
FAQs
What is the best way to grind the urad dal batter?
Using a wet grinder is ideal for a super smooth batter. But a high-powered blender works well too! Add water gradually while grinding to achieve the right consistency.
Can I make the batter ahead of time?
Yes, you can! The batter can be made a few hours in advance and stored in the refrigerator. Just give it a good stir before using.
How do I prevent the vadas from absorbing too much oil?
Make sure the oil isn’t too hot, and don’t overcrowd the pan. Soaking the vadas in warm water before adding the yogurt coating also helps.
What can I substitute for asafoetida (hing)?
If you can’t find hing, you can omit it, but it does add a unique flavor. A pinch of garlic powder can be a very distant substitute.
Can I bake these vadas instead of frying?
While frying gives the best results, you can try baking them. Preheat your oven to 200°C (390°F) and bake for about 20-25 minutes, flipping halfway through. They won’t be as crispy, but still tasty!
Enjoy making these delicious Urad Dal Vadas! Let me know how they turn out in the comments below. Happy cooking!


Neha Deshmukh
Neha holds a B.A. in History with a focus on Indian and world history, including ancient, medieval, and modern periods. At RecipesOfIndia.org — the world’s largest database of Indian recipes — she combines her love for food and history by exploring how India’s past has shaped its culinary traditions.


